MANUAL DEL USUARIO DESHUMIDIFICADOR DE REFRIGERACIÓN ...h2otek.com/tienda/pdf/controlhumedad/MANUAL...
25
MANUAL DEL USUARIO DESHUMIDIFICADOR DE REFRIGERACIÓN PORTÁTIL 26 LITROS MARCA H2OTEK MOD. RD-26L/D-106 USER’S MANUAL PORTABLE REFRIGERATION DEHUMIDIFIER 26 LITERS H2OTEK MOD. RD-26L/D-106 Contenido/Espanol Aviso antes de uso ..................... 2 Estructura del Producto ............ 3 Instrucciones de Operación ....... 4 Mantenimiento y Cuidados ........ 8 Solución de Problemas................ 10 Especificaciones Técnicas .......... 11 Distribuidor ................................ 13 Content/English Noce before use ....................... 14 Product Structure ....................... 15 Operaon Instrucon ................. 16 Care & Maintenance .................. 20 Troubleshoong ......................... 22 Technical Specificaons ............ 23 Distributor .................................. 25
Transcript of MANUAL DEL USUARIO DESHUMIDIFICADOR DE REFRIGERACIÓN ...h2otek.com/tienda/pdf/controlhumedad/MANUAL...

MANUAL DEL USUARIO
DESHUMIDIFICADOR DE
REFRIGERACIÓN PORTÁTIL
26 LITROS MARCA H2OTEK MOD. RD-26L/D-106
USER’S MANUAL
PORTABLE REFRIGERATION
DEHUMIDIFIER 26 LITERS H2OTEK MOD. RD-26L/D-106
Contenido/Espan ol
Aviso antes de uso ..................... 2
Estructura del Producto ............ 3
Instrucciones de Operación ....... 4
Mantenimiento y Cuidados ........ 8
Solución de Problemas ................ 10
Especificaciones Técnicas .......... 11
Distribuidor ................................ 13
Content/English
Notice before use ....................... 14
Product Structure ....................... 15
Operation Instruction ................. 16
Care & Maintenance .................. 20
Troubleshooting ......................... 22
Technical Specifications ............ 23
Distributor .................................. 25

2
Gracias por elegir nuestro Deshumidificador
Por favor, lea este manual cuidadosamente antes de usar el equipo y guárdelo como referen-cia para futuras consultas.
AVISO ANTES DE USO Importante Por motivos de seguridad, debe leer las instrucciones detenidamente antes de utilizar el apara-to por primera vez. Guarde las instrucciones para referencia futura. El aparato está diseñado para uso doméstico y solo se puede instalar y utilizar de acuerdo con estas instrucciones de uso. Desenchufe el cable de suministro de energía antes de limpiarlo o guardarlo. No sumerja la unidad en agua ni la coloque cerca del agua. No coloque la unidad cerca de dispositivos generadores de calor o cerca de materiales in-
flamables y peligrosos. Nunca coloque sus dedos o cualquier objeto en forma de barra en la rejilla de entrada o
salida de aire. No se siente ni se pare sobre la unidad. Deseche el agua recogida en el tanque según las instrucciones. Instale la tubería de drenaje en una dirección descendente para asegurarse de que el agua
condensada pueda drenarse continuamente. Coloque y opere la unidad en un piso estable y nivelado. No rocíe ni salpique agua directamente sobre la unidad. No rocíe ningún pesticida ni líquido inflamable en la unidad. No coloque ningún objeto pesado ni deje que los niños y las mascotas se sienten en la uni-
dad. No opere el deshumidificador en un espacio pequeño y confinado. El cable de alimentación dañado debe ser reemplazado por un técnico autorizado. Mantenga la ropa al menos a 40 cm de la salida de aire para evitar que el agua gotee a la
unidad. Mantenga la separación mínima debajo del deshumidificador durante la operación.

3
ESTRUCTURA DEL PRODUCTO
Frente
Atrás

4
INSTRUCCIONES DE OPERACIÓN
Panel de Control
INDICADORES
Indicador de Tanque Lleno
El indicador de tanque lleno se iluminará en rojo cuando el tanque de agua esté lleno, la máquina
dejará de funcionar. Si la luz está encendida, vacíe el agua del tanque de agua y asegúrese de que
el tanque vuelva a su posición correctamente.
Botón de encendido / apagado
El indicador verde de encendido se encenderá cuando la unidad esté enchufada,
independientemente de si la máquina está en funcionamiento o no.
Botón de temporizador
Cuando configura el temporizador, se iluminará en verde cuando se inicie el tiempo o se apague.
Indicador de auto deshumidificación
La humedad predeterminada es 50%, el indicador se mostrará verde.
Indicador de velocidad del ventilador
El indicador de velocidad del ventilador derecho se iluminará en verde cuando la máquina esté
configurada para funcionar a baja velocidad del ventilador.
El indicador de velocidad del ventilador izquierdo se iluminará en rojo cuando la máquina esté
configurada para funcionar a alta velocidad del ventilador.
Indicador de deshumedecimiento continuo
La máquina se deshumidificará continuamente en este modo, la velocidad del ventilador
predeterminada es alta y se puede ajustar manualmente, la humedad no se puede ajustar.
Nivel de humedad e indicador del temporizador
Cuando la unidad está enchufada, indicará el nivel de humedad de la habitación.
Cuando configura la humedad, indicará la humedad que ha seleccionado.
Cuando programe el tiempo para que la unidad se encienda o apague, le mostrará las horas
Cuando presione el botón de ajuste de humedad durante 2 segundos, se mostrará la humedad
actual.

5
Operación Básica
Nota:
Antes de encender la unidad, asegúrese de que la rejilla de salida de aire esté abierta. De
lo contrario, la unidad puede sobrecalentarse.
1. Inicie la unidad
Cuando la unidad está enchufada, un zumbador emitirá un pitido y la unidad se configura-
rá para funcionar a baja velocidad del ventilador de forma predeterminada. Presione el
botón para iniciar la operación, la humedad predeterminada es 50%.
2. Establecer la velocidad del ventilador
Presione el botón para establecer la velocidad deseada del ventilador entre alta y ba-
ja.
3. Establecer el nivel de humedad
Presione el botón para establecer el nivel de humedad deseado en la habitación.
Botón Agregar
Presione este botón para agregar la humedad y el tiempo; el procedimiento de configura-
ción de la humedad es 50% -55% -60% -65% -70% -75% -80% -85% -90% -95%.
Botón Reducir
Presione este botón para reducir la humedad y el tiempo; el procedimiento de configura-
ción de la humedad es 50% -45% -40% -35% -30% -25% -20%.
4. Detener la operación
Presione el botón de nuevo para detener la operación.
Nota:
Nunca detenga la unidad desenchufando el cable de alimentación.
Cuando la temperatura ambiente está entre 5c y 12c, la unidad hará una pausa cada 30
minutos para descongelar automáticamente.
Cuando la temperatura ambiente está entre 12c y 20c, la unidad hará una pausa cada
45min para descongelar automáticamente.
Cuando la temperatura ambiente está entre 20c y 35c, el autodescongelamiento no se
activará.

6
DRENAJE DE AGUA Cuando el tanque de agua está lleno, el indicador de tanque lleno se encenderá, la operación se detendrá automáticamente. Un zumbador sonará 15 veces para alertar al usuario a vaciar el agua del tanque de agua. Vaciar el tanque de agua. Nota: No retire el flotador del tanque de agua. El sensor de agua llena ya no podrá detectar el nivel de agua correctamente sin el flotador y puede filtrarse agua del tanque de agua.

7
Si el tanque de agua está sucio, lávelo con agua fría o tibia. No use detergente, estropajos, tra-pos de polvo tratados químicamente, gasolina, benceno, diluyente u otros solventes, ya que pueden rayar y dañar el tanque y causar fugas de agua. Cuando reemplace el tanque de agua, presione el tanque firmemente en su lugar con ambas manos. Si el tanque no está colocado correctamente, el sensor "tanque lleno" seguirá activa-do, y el deshumidificador no funcionará. Drenaje continuo 1. Retire la cubierta de plástico sobre el tanque de agua. 2. Inserte la tubería en el orificio del puerto de salida de agua. 3. Inserte un tubo de PVC con 9.5mm (diámetro interno 9.5mm), y la longitud recomendada
es 300mm; pon el otro lado en un contenedor, como un cubo. Precaución: 1. Nunca bloquee la salida de agua o la tubería, el agua fluirá al tanque de agua si está blo-
queada. 2. Nunca doble la tubería de drenaje y esté siempre más baja que la salida. 3. Debe cerrar la tapa cuando no necesite drenaje continuo.

8
MANTENIMIENTO Y CUIDADOS NOTA: APAGUE LA UNIDAD Y DESCONECTE ANTES DE CUALQUIER MANTENIMIENTO O REPARACIÓN PARA EVITAR CHOQUES ELÉCTRICOS.
Limpieza Desenchufe la unidad antes de cualquier limpieza. Limpie la carcasa con un paño suave humedecido. No use solventes químicos (como benceno, alcohol, gasolina). La superficie puede dañarse o incluso la carcasa puede deformarse. No rocíe agua en la unidad. Filtro de aire La unidad está equipada con un filtro de aire lavable. Saca el filtro lavable. Después de la operación de limpieza, inserte el filtro nuevamente en su lugar. Limpie el filtro lavable cada 2 semanas. Si el filtro está bloqueado con polvo, la eficiencia se reducirá. Lave el filtro de aire sumergiéndolo suavemente en agua tibia (alrededor de 40°) con un deter-gente neutro, enjuáguelo y séquelo cuidadosamente en un lugar sombreado. 1. Saque el filtro 2. Limpie el filtro
9
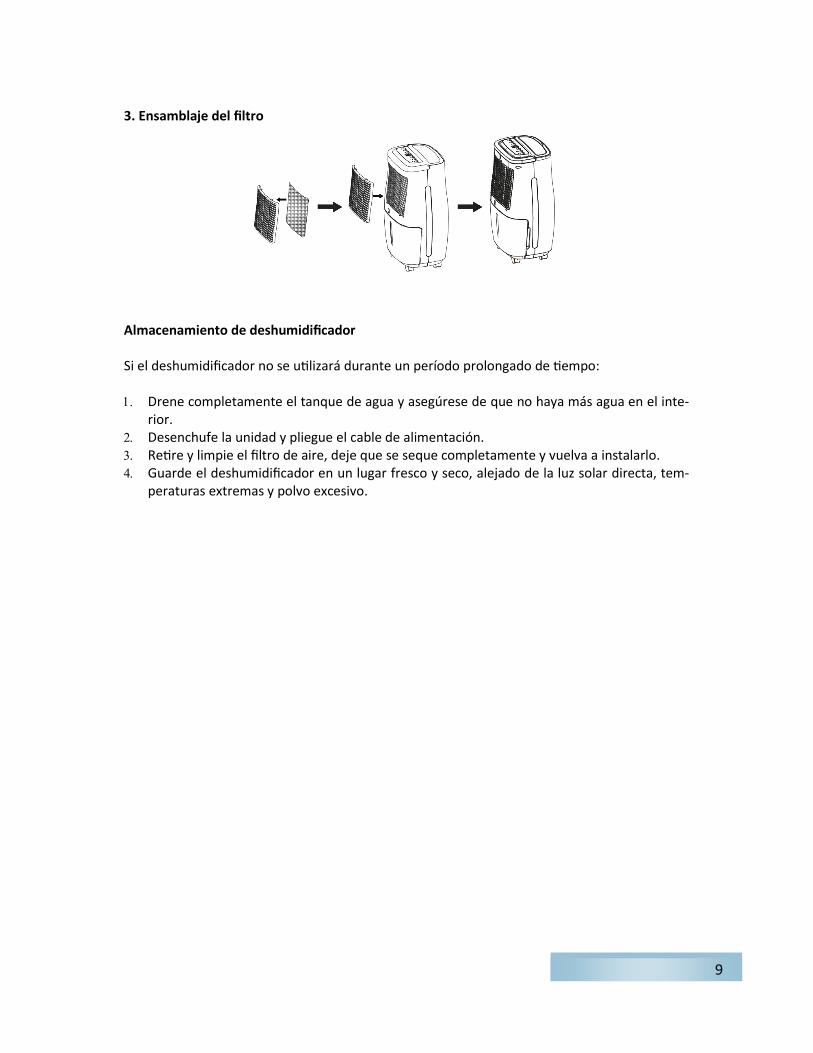
3. Ensamblaje del filtro Almacenamiento de deshumidificador Si el deshumidificador no se utilizará durante un período prolongado de tiempo: Drene completamente el tanque de agua y asegúrese de que no haya más agua en el inte-
rior. Desenchufe la unidad y pliegue el cable de alimentación. Retire y limpie el filtro de aire, deje que se seque completamente y vuelva a instalarlo. Guarde el deshumidificador en un lugar fresco y seco, alejado de la luz solar directa, tem-
peraturas extremas y polvo excesivo.
10
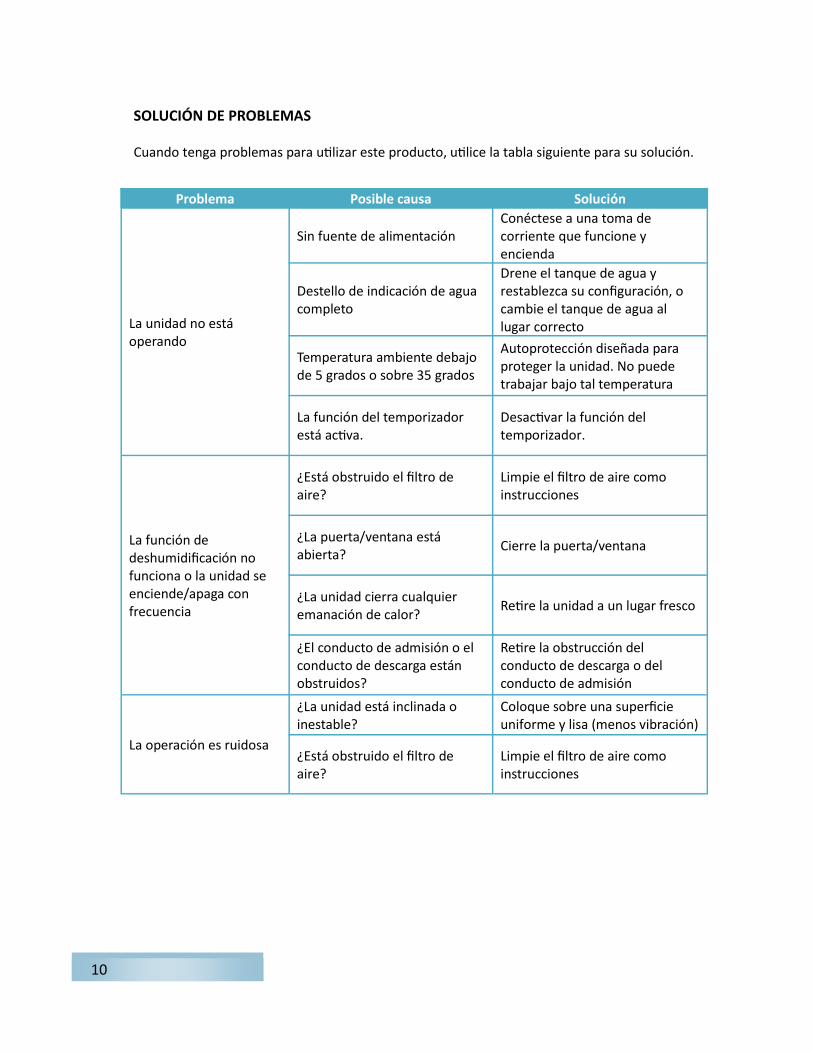
SOLUCIÓN DE PROBLEMAS Cuando tenga problemas para utilizar este producto, utilice la tabla siguiente para su solución.
Problema Posible causa Solución
La unidad no está operando
Sin fuente de alimentación
Conéctese a una toma de corriente que funcione y encienda
Destello de indicación de agua completo
Drene el tanque de agua y restablezca su configuración, o cambie el tanque de agua al lugar correcto
Temperatura ambiente debajo de 5 grados o sobre 35 grados
Autoprotección diseñada para proteger la unidad. No puede trabajar bajo tal temperatura
La función del temporizador está activa.
Desactivar la función del temporizador.
La función de deshumidificación no funciona o la unidad se enciende/apaga con frecuencia
¿Está obstruido el filtro de aire?
Limpie el filtro de aire como instrucciones
¿La puerta/ventana está abierta?
Cierre la puerta/ventana
¿La unidad cierra cualquier emanación de calor?
Retire la unidad a un lugar fresco
¿El conducto de admisión o el conducto de descarga están obstruidos?
Retire la obstrucción del conducto de descarga o del conducto de admisión
La operación es ruidosa
¿La unidad está inclinada o inestable?
Coloque sobre una superficie uniforme y lisa (menos vibración)
¿Está obstruido el filtro de aire?
Limpie el filtro de aire como instrucciones

11
ESPECIFICACIONES TÉCNICAS
Las especificaciones están sujetas a cambios sin previo aviso.
Modelo RD-126L/D-106
Tipo/Sistema Refrigeración/Condensación
Tipo de Refrigerante R134A
Litros/Día 26
Pintas (30C/80RH) 50
Voltaje 120
Fases 1
Watts 410
Amperes 3.8
Hz 60
Capacidad total en BTU/HR 2100
Contenedor para agua 4 litros
Tipo de conexión Plug estándar
Flujo de aire M3/H 180
CFM 106
Tipo Portátil
Filtro de aire lavable Si
Control Control LCD marca H2OTEK
Rango 40 – 80%
Temporizador/Temp. Ajustable Si/1-24 horas
Temperatura de trabajo 5-35°C
Dimensiones (cm) 35 x 27.5 x 59.5
Gabinete Plástico
Color Blanco
Nivel de ruido 45dB
Dimensiones paquete (cm) 40.6 x 33 x 63.6
Peso (Kg) 15
Peso paquete (Kg) 17
Garantía 1 año

12
Descongelamiento automático, trabajo a baja temperatura 5°C ≤ temperatura ≤ 12°C, la máquina se descongelaría automáticamente por cada 30 minutos 13°C ≤ temperatura ≤ 20°C, la máquina se descongelaría automáticamente cada 45 minutos. Nota: Si la indicación de agua llena está encendida a menudo, puede haber un mal funciona-miento de la unidad. Póngase en contacto con un profesional de servicio para obtener ayuda. Precauciones: apague la unidad y desconéctela inmediatamente si ocurre algo anormal. Luego contacte a un electricista calificado.
No deseche electrodomésticos como basura municipal sin clasificar, use in-stalaciones de recolección separadas. Póngase en contacto con su gobierno local para obtener información sobre los sistemas de recolección disponibles.

13
GARANTÍA LIMITADA DE 1 AÑO
Los Deshumidificadores marca H2OTEK y los accesorios relacionados están garantizados al comprador original contra defectos de material y mano de obra bajo un buen uso he instalación de la unidad en un periodo de 12 meses, a partir de la fecha de compra. Cualquier parte determina que es defectuoso y devuelto al fabricante, el costo de envío por adelantado, será reparada o reemplazada por H2O TEK sin costo alguno. La prueba de la fecha de compra y una explicación del problema o queja deberá acompañar a la parte devuelta de la máquina.
H2O TEK se reserva el derecho de verificar la legitimidad de los defectos reclamados. Las disposiciones de esta garantía no se aplicará a los daños resultantes del uso indebido directa o indirectamente, negligencia, accidentes, falta de mantenimiento, reparaciones no autorizadas o alteraciones que afectan al rendimiento de la máquina o la confiabilidad.
H2O TEK, S.A. de C.V.
HORARIOS DE ATENCIÓN
(TIEMPO DEL CENTRO)
Lunes a Viernes:
8:30 am a 1:30 pm
2:30 pm a 6:00 pm
Sábado:
8:30 am a 1:00 pm
LLAME SIN COSTO
01 800 9 H2O TEK
(01 800 9426 835)
SKYPE: ventas-h2otek
Website: www.h2otek.com
RFC: HTE090324LX6
ATENCION A CLIENTES
(NACIONAL):[email protected]
OFICINA MONTERREY N.L.
(MATRIZ):
Av. Dr. Eleuterio González No. 2641
Col. Mitras Norte, Monterrey, N.L.
México C.P. 64320
Conmutador: (52) 81 83467510
(52) 81 83467534
(52) 81 83738802
(52) 81 23162248
(52) 81 23162249
PLANTA:
Av. Gonzalitos No. 2637
Col. Mitras Norte,
Monterrey, N.L. México C.P. 64320
OFICINA DE VENTAS
CD. DE MÉXICO, CDMX:
Av. Tonalá 285-1, Colonia Roma Sur,
Delegación Cuauhtémoc
entre Tepeji y Tepic,
Cd. de México, CDMX
C.P. 06760
Conmutador: (52) 55 55749734
(52) 55 52645077
(52) 55 67198048
OFICINA DE VENTAS
GUADALAJARA, JAL.
Ave. Enrique Díaz de León No. 893
Col. Moderna Guadalajara, Jalisco
C.P. 44190
Conmutador: (52) 33 31620109
(52) 33 38129375
OFICINA DE VENTAS
CANCÚN Q.R.:
Ave. Chichen Itza No. 355
SM 062, MZ 5, LOTE 2
Zona Urbana
Cancún Quintana Roo
C.P. 77520
Conmutador: (52) 998 3132858
(52) 998 2175625
TIJUANA, BCN
(52) 664 231 7774

14
Owner’s Manual
Please read these instructions and warranty information carefully before use and keep them handy for future reference!
NOTICE BEFORE USE Important For Safety purpose, you should read the instructions carefully before using the appliance for the first time. Save the instructions for future reference. The appliance is designed for domestic use and may only be installed and operated in accor-dance with these instructions for use Unplug the power supply cord before cleaning or storage Do not immerse the unit in water, or place it close to water Do not put the unit close to heat generating devices or near flammable and dangerous ma-
terials Never put your fingers or any stick-form objects into the air inlet or outlet grille Do not sit or stand on the unit Discard water collected in the tank as instructed Install drain piping at a downward direction to make sure that condensed water can be
drained continuously Place and operate the unit on a stable and level floor Do not spray or splash water directly onto the unit Do not spray any pesticide nor flammable liquid onto the unit Do not place any heavy object or let children and pets sit on the unit Do not operate dehumidifier in a small and confined space Damaged power cord must be replaced by a licensed technician Keep the clothes at least 40cm from the air outlet to prevent water from dripping to the
unit Maintain the below minimum clearance around the dehumidifier during operation

15
PRODUCT STRUCTURE
Front
Back
16
OPERATION INSTRUCTIONS
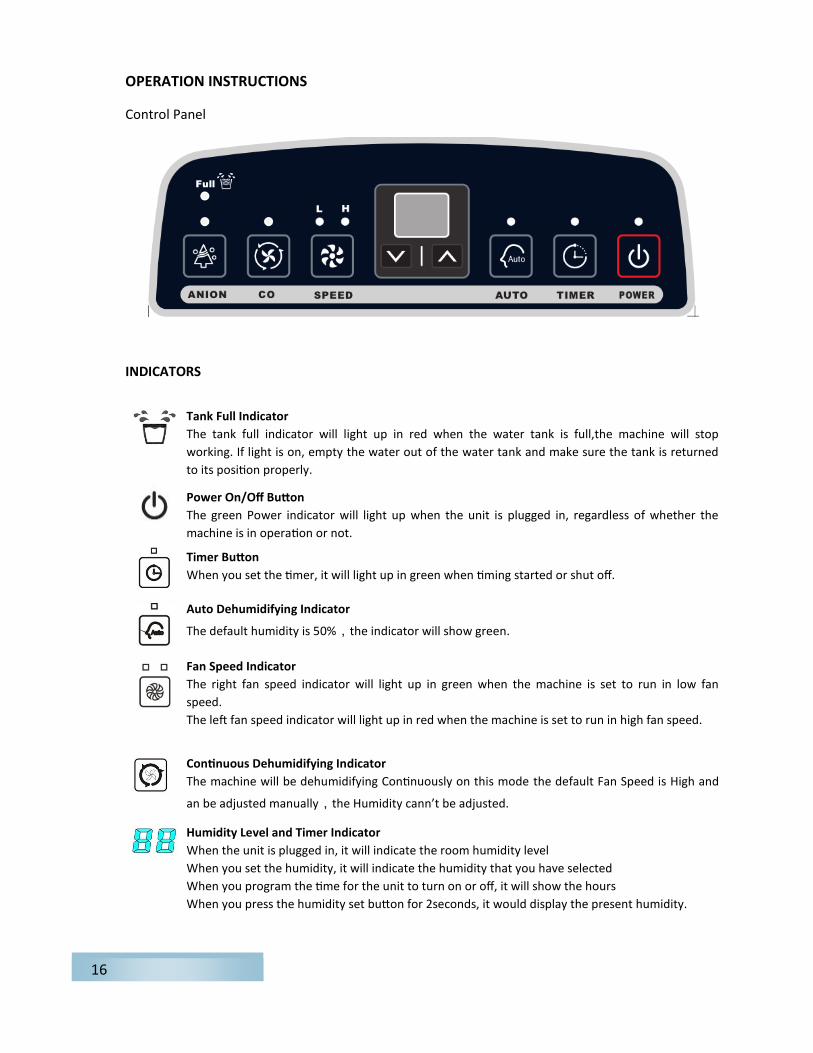
Control Panel
INDICATORS
Tank Full Indicator
The tank full indicator will light up in red when the water tank is full,the machine will stop
working. If light is on, empty the water out of the water tank and make sure the tank is returned
to its position properly.
Power On/Off Button
The green Power indicator will light up when the unit is plugged in, regardless of whether the
machine is in operation or not.
Timer Button
When you set the timer, it will light up in green when timing started or shut off.
Auto Dehumidifying Indicator
The default humidity is 50%,the indicator will show green.
Fan Speed Indicator
The right fan speed indicator will light up in green when the machine is set to run in low fan
speed.
The left fan speed indicator will light up in red when the machine is set to run in high fan speed.
Continuous Dehumidifying Indicator
The machine will be dehumidifying Continuously on this mode the default Fan Speed is High and
an be adjusted manually,the Humidity cann’t be adjusted.
Humidity Level and Timer Indicator
When the unit is plugged in, it will indicate the room humidity level
When you set the humidity, it will indicate the humidity that you have selected
When you program the time for the unit to turn on or off, it will show the hours
When you press the humidity set button for 2seconds, it would display the present humidity.
17
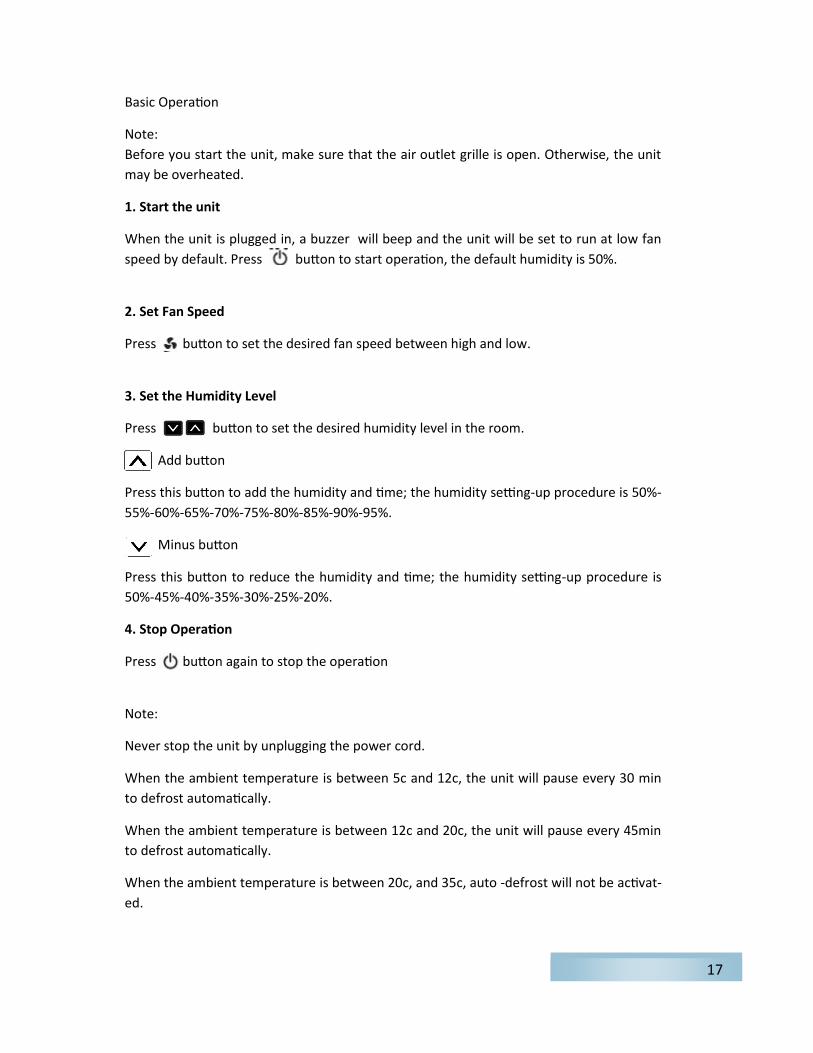
Basic Operation
Note:
Before you start the unit, make sure that the air outlet grille is open. Otherwise, the unit
may be overheated.
1. Start the unit
When the unit is plugged in, a buzzer will beep and the unit will be set to run at low fan
speed by default. Press button to start operation, the default humidity is 50%.
2. Set Fan Speed
Press button to set the desired fan speed between high and low.
3. Set the Humidity Level
Press button to set the desired humidity level in the room.
Add button
Press this button to add the humidity and time; the humidity setting-up procedure is 50%-
55%-60%-65%-70%-75%-80%-85%-90%-95%.
Minus button
Press this button to reduce the humidity and time; the humidity setting-up procedure is
50%-45%-40%-35%-30%-25%-20%.
4. Stop Operation
Press button again to stop the operation
Note:
Never stop the unit by unplugging the power cord.
When the ambient temperature is between 5c and 12c, the unit will pause every 30 min
to defrost automatically.
When the ambient temperature is between 12c and 20c, the unit will pause every 45min
to defrost automatically.
When the ambient temperature is between 20c, and 35c, auto -defrost will not be activat-
ed.
18
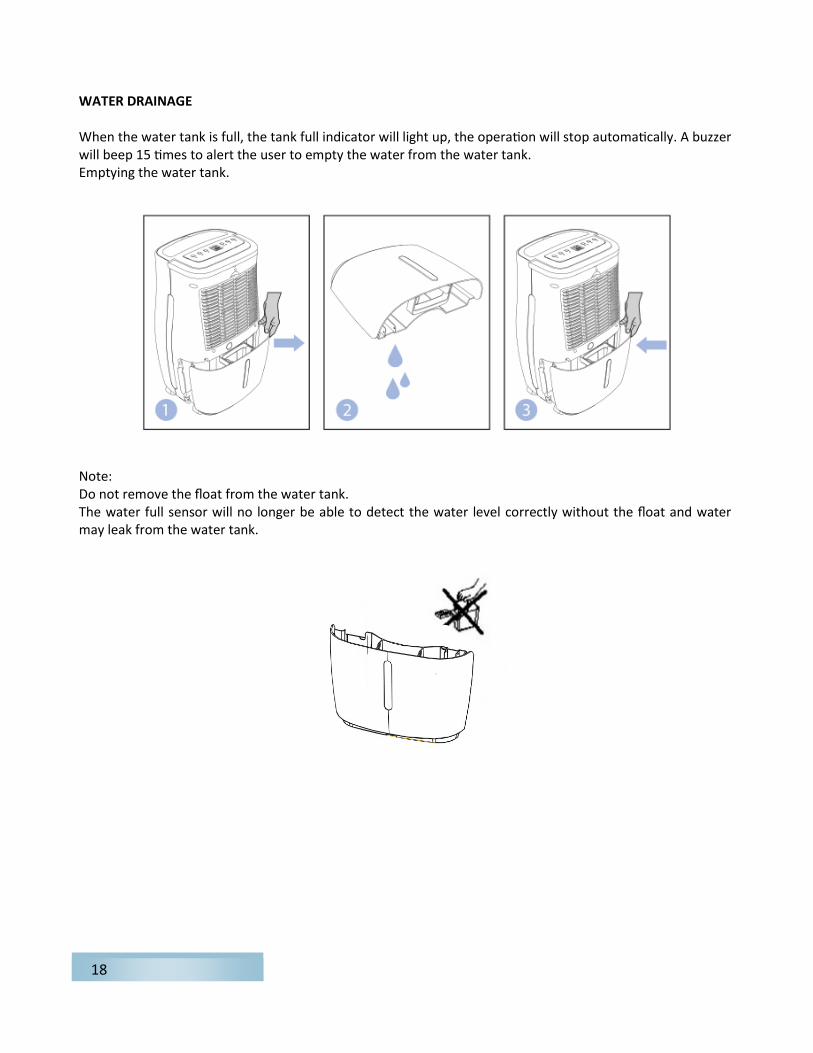
WATER DRAINAGE When the water tank is full, the tank full indicator will light up, the operation will stop automatically. A buzzer will beep 15 times to alert the user to empty the water from the water tank. Emptying the water tank. Note: Do not remove the float from the water tank. The water full sensor will no longer be able to detect the water level correctly without the float and water may leak from the water tank.
19
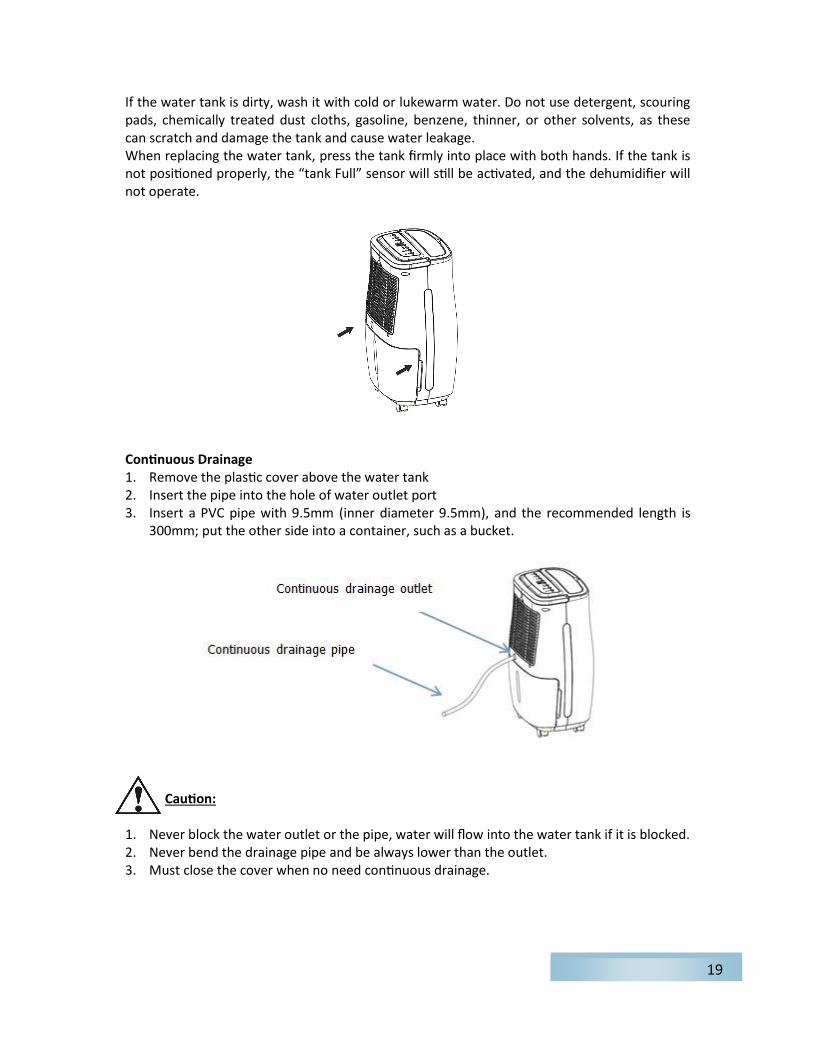
If the water tank is dirty, wash it with cold or lukewarm water. Do not use detergent, scouring pads, chemically treated dust cloths, gasoline, benzene, thinner, or other solvents, as these can scratch and damage the tank and cause water leakage. When replacing the water tank, press the tank firmly into place with both hands. If the tank is not positioned properly, the “tank Full” sensor will still be activated, and the dehumidifier will not operate. Continuous Drainage 1. Remove the plastic cover above the water tank 2. Insert the pipe into the hole of water outlet port 3. Insert a PVC pipe with 9.5mm (inner diameter 9.5mm), and the recommended length is
300mm; put the other side into a container, such as a bucket. Caution: 1. Never block the water outlet or the pipe, water will flow into the water tank if it is blocked. 2. Never bend the drainage pipe and be always lower than the outlet. 3. Must close the cover when no need continuous drainage.
20
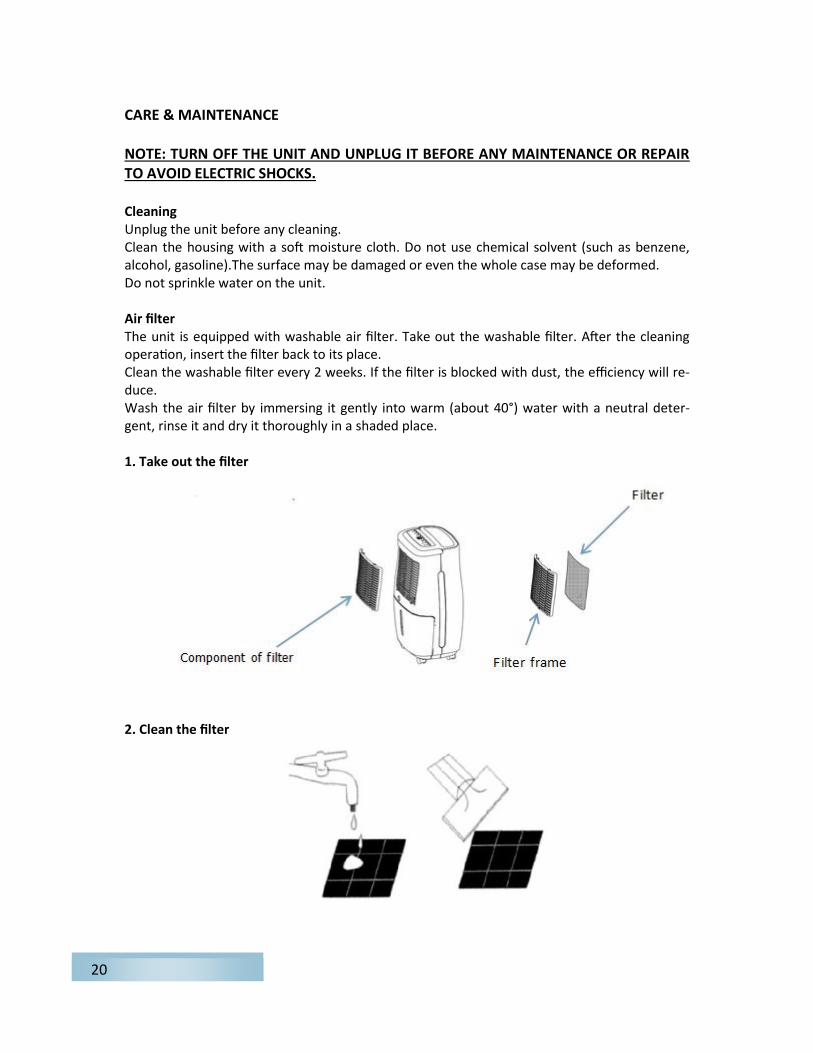
CARE & MAINTENANCE NOTE: TURN OFF THE UNIT AND UNPLUG IT BEFORE ANY MAINTENANCE OR REPAIR TO AVOID ELECTRIC SHOCKS. Cleaning Unplug the unit before any cleaning. Clean the housing with a soft moisture cloth. Do not use chemical solvent (such as benzene, alcohol, gasoline).The surface may be damaged or even the whole case may be deformed. Do not sprinkle water on the unit. Air filter The unit is equipped with washable air filter. Take out the washable filter. After the cleaning operation, insert the filter back to its place. Clean the washable filter every 2 weeks. If the filter is blocked with dust, the efficiency will re-duce. Wash the air filter by immersing it gently into warm (about 40°) water with a neutral deter-gent, rinse it and dry it thoroughly in a shaded place. 1. Take out the filter 2. Clean the filter
21
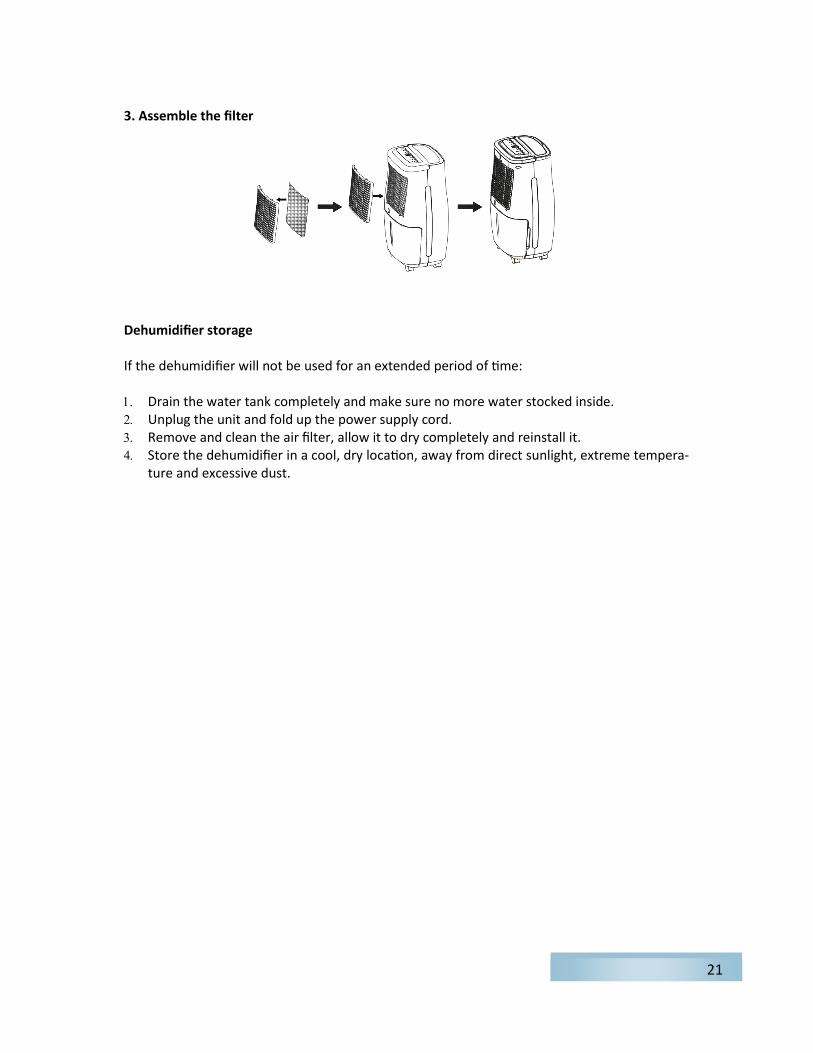
3. Assemble the filter Dehumidifier storage If the dehumidifier will not be used for an extended period of time: Drain the water tank completely and make sure no more water stocked inside. Unplug the unit and fold up the power supply cord. Remove and clean the air filter, allow it to dry completely and reinstall it. Store the dehumidifier in a cool, dry location, away from direct sunlight, extreme tempera-
ture and excessive dust.

22
TROUBLESHOOTING When you run into any problems operating this product, use the table below to troubleshoot the problems.
Note: If the problem persists or other abnormal situations occur, turn off the machine and pull out the plug. Then contact our Repair center for help.
Problem Possible Cause Solution
The unit doesn't operate
No power supply Connect to a functioning outlet and switch on
Water Full Indication Flash
Drain water tank and reset your setting, or replace the water tank to right place
Room temperature under 5 degree or above 35 degree
Self-Protection designed to protect the unit. Can not work under such temperature
Timer function is active. Deactivate Timer function.
The dehumidifying function doesn't work or the unit turn on / off frequently
Is the air filter clogged? Clean the air filter as instructions
Is the door/window opened?
Close the door / window
Is the unit close any heat emanation?
Remove the unit to a cool place
Is the intake duct or discharge duct obstructed?
Remove the obstruction from the discharge duct or intake duct.
Operation is noisy
Is the unit tilted or unsteady? Place on an even, solid surface (less vibration).
Is the air filter clogged? Clean the air filter as instructions
23
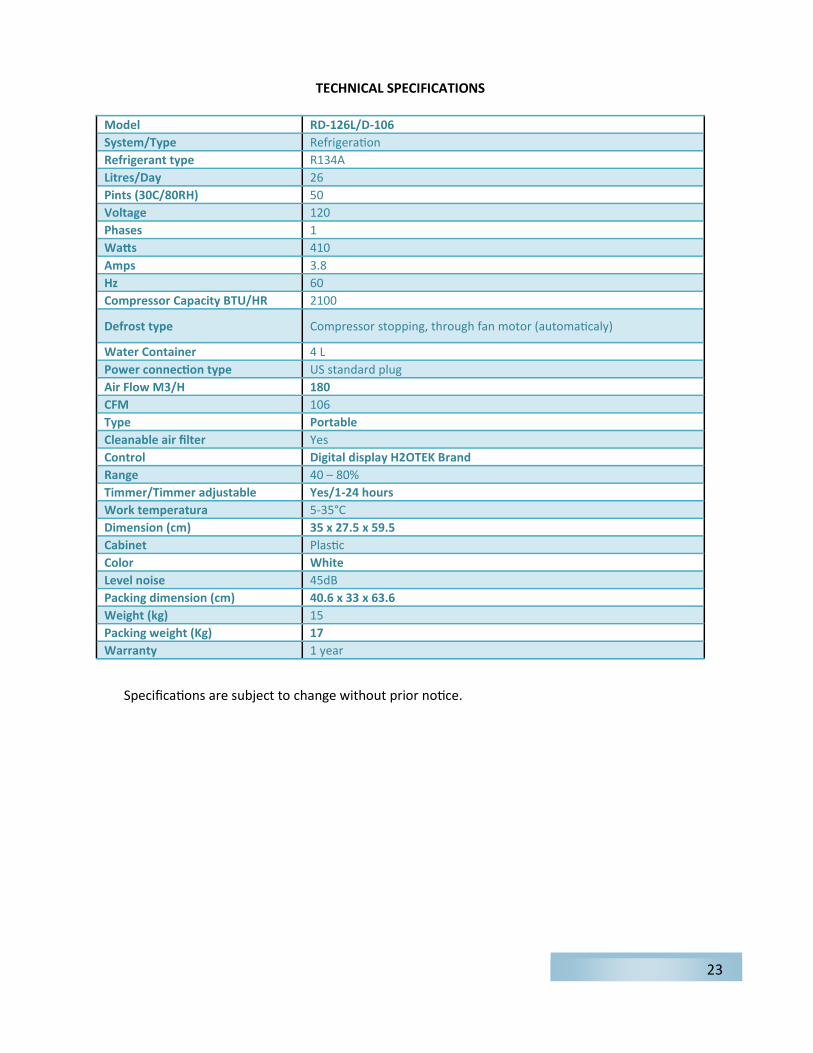
TECHNICAL SPECIFICATIONS
Specifications are subject to change without prior notice.
Model RD-126L/D-106
System/Type Refrigeration
Refrigerant type R134A
Litres/Day 26
Pints (30C/80RH) 50
Voltage 120
Phases 1
Watts 410
Amps 3.8
Hz 60
Compressor Capacity BTU/HR 2100
Defrost type Compressor stopping, through fan motor (automaticaly)
Water Container 4 L
Power connection type US standard plug
Air Flow M3/H 180
CFM 106
Type Portable
Cleanable air filter Yes
Control Digital display H2OTEK Brand
Range 40 – 80%
Timmer/Timmer adjustable Yes/1-24 hours
Work temperatura 5-35°C
Dimension (cm) 35 x 27.5 x 59.5
Cabinet Plastic
Color White
Level noise 45dB
Packing dimension (cm) 40.6 x 33 x 63.6
Weight (kg) 15
Packing weight (Kg) 17
Warranty 1 year
24
Auto Defrost, Low temperature work 5°C ≤ temperature ≤ 12°C, machine would defrost automatically for every 30 minutes 13°C ≤ temperature ≤ 20°C, machine would defrost automatically for every 45 minutes Note: If the water full indication is often on, there may be some malfunction about the unit. Contact a service professional for help. Cautions: Switch off the unit and unplug it immediately if anything abnormal happens. Then contact a qualified electrician.
Do not dispose of electrical appliances as unsorted municipal waste, use sep-arate collection facilities. Contact you local government for information regarding the collection sys-tems available.

25
GARANTÍA LIMITADA DE 1 AÑO
Los Deshumidificadores marca H2OTEK y los accesorios relacionados están garantizados al comprador original contra defectos de material y mano de obra bajo un buen uso he instalación de la unidad en un periodo de 12 meses, a partir de la fecha de compra. Cualquier parte determina que es defectuoso y devuelto al fabricante, el costo de envío por adelantado, será reparada o reemplazada por H2O TEK sin costo alguno. La prueba de la fecha de compra y una explicación del problema o queja deberá acompañar a la parte devuelta de la máquina.
H2O TEK se reserva el derecho de verificar la legitimidad de los defectos reclamados. Las disposiciones de esta garantía no se aplicará a los daños resultantes del uso indebido directa o indirectamente, negligencia, accidentes, falta de mantenimiento, reparaciones no autorizadas o alteraciones que afectan al rendimiento de la máquina o la confiabilidad.
H2O TEK, S.A. de C.V.
HORARIOS DE ATENCIÓN
(TIEMPO DEL CENTRO)
Lunes a Viernes:
8:30 am a 1:30 pm
2:30 pm a 6:00 pm
Sábado:
8:30 am a 1:00 pm
LLAME SIN COSTO
01 800 9 H2O TEK
(01 800 9426 835)
SKYPE: ventas-h2otek
Website: www.h2otek.com
RFC: HTE090324LX6
ATENCION A CLIENTES
(NACIONAL):[email protected]
OFICINA MONTERREY N.L.
(MATRIZ):
Av. Dr. Eleuterio González No. 2641
Col. Mitras Norte, Monterrey, N.L.
México C.P. 64320
Conmutador: (52) 81 83467510
(52) 81 83467534
(52) 81 83738802
(52) 81 23162248
(52) 81 23162249
PLANTA:
Av. Gonzalitos No. 2637
Col. Mitras Norte,
Monterrey, N.L. México C.P. 64320
OFICINA DE VENTAS
CD. DE MÉXICO, CDMX:
Av. Tonalá 285-1, Colonia Roma Sur,
Delegación Cuauhtémoc
entre Tepeji y Tepic,
Cd. de México, CDMX
C.P. 06760
Conmutador: (52) 55 55749734
(52) 55 52645077
(52) 55 67198048
OFICINA DE VENTAS
GUADALAJARA, JAL.
Ave. Enrique Díaz de León No. 893
Col. Moderna Guadalajara, Jalisco
C.P. 44190
Conmutador: (52) 33 31620109
(52) 33 38129375
OFICINA DE VENTAS
CANCÚN Q.R.:
Ave. Chichen Itza No. 355
SM 062, MZ 5, LOTE 2
Zona Urbana
Cancún Quintana Roo
C.P. 77520
Conmutador: (52) 998 3132858
(52) 998 2175625
TIJUANA, BCN
(52) 664 231 7774