


Idiomas
Páginas
Jurídico


SaMASZ Sp. z o.o. Poland, 16-060 Zabłudów, ul. Trawiasta 1
Established – 1984
NIP PL-966-159-29-76
tel. (+48) (85) 664 70 31
fax (+48) (85) 664 70 41
e-mail: [email protected]
www.samasz.pl
OPERATOR’S MANUAL
REAR – FRONT AND REAR
FLAIL MOWERS
Light duty class Medium duty class Heavy duty class
MIDO 140 – 4' 7'' / 1,40 m GRINO 160 – 5'3'' / 1,60 m MAMUT 250 – 8'2'' / 2,50 m
MIDO 160 – 5'3'' / 1,60 m GRINO 180 – 5'11'' / 1,80 m MAMUT 280 – 9'2'' / 2,80 m
MIDO 180 – 5'11'' / 1,80 m GRINO 200 – 6'7'' / 2,00 m MAMUT 300 – 9'10'' / 3,00 m
MIDO 200 – 6'7'' / 2,00 m GRINO 220 – 7'2'' / 2,20 m RIO 250 – 8'2'' / 2,50 m
MIDO 220 – 7'2'' / 2,20 m VINO 180 – 5'11'' / 1,80 m RIO 280 – 9'2'' / 2,80 m
IN341USA010 2018.07.31
Edition 10
Translation of the original manual
Serial no:

IT IS FORBIDDEN
FOR PEOPLE NOT INVOLVED
IN OPERATION OF THE
MOWER TO REMAIN WITHIN
170' / 50 M FROM THE MOWER
DO NOT
START THE MOWER UNLESS IT
IS IN THE CORRECT WORKING
POSITION
NOTE:
Keep this manual for future use.
Well-proven design with thousands of machines in regular use in many countries and quality
materials used ensure high durability and reliability of SaMASZ mowers.
We congratulate you on the purchase of your new SaMASZ mower and wish you much pleasure and
the very best work results through the years to come.

Instruction manual
Rear - front and rear flail mowers MIDO, GRINO, VINO, MAMUT, RIO
- 1 -
Table of contents page
1. IDENTIFYING THE MACHINE ..................................................................................................................... 2
2. INTRODUCTION .............................................................................................................................................. 2
3. INTENDED USE ................................................................................................................................................. 3
3.1. Technical data ................................................................................................................................................ 3
3.2. Design and working principle ........................................................................................................................ 4
3.3. Equipment and spare parts ............................................................................................................................. 5
3.3.1. Flail knives applicable in mowers MIDO, GRINO, VINO, MAMUT, RIO ........................................... 6
4. SAFETY PRECAUTIONS ................................................................................................................................. 8
4.1. Safety rules and regulations ........................................................................................................................... 8
4.2. Qualifications of operator .............................................................................................................................. 9
4.3. Conditions of connecting mower with vehicle............................................................................................. 10
4.4. Transport ...................................................................................................................................................... 10
4.4.1. Putting the machine onto another vehicle for transport ......................................................................... 10
4.5. Working parts .............................................................................................................................................. 11
4.6. Telescoping articulated shaft ....................................................................................................................... 12
4.7. Residual risk ................................................................................................................................................ 12
4.7.1. Residual risk assessment ........................................................................................................................ 13
4.8. Safety labels and their meanings .................................................................................................................. 13
5. USE OF MOWER ............................................................................................................................................. 15
5.1. Mounting mower on tractor ......................................................................................................................... 15
5.1.1. Preparing mower for connection to front of tractor ............................................................................... 16
5.2. Connecting the PTO shaft ............................................................................................................................ 17
5.3. Preparing mower for transport ..................................................................................................................... 18
5.4. Preparing mower for operation .................................................................................................................... 18
5.5. Switching the mower from central to side position ..................................................................................... 18
5.6. Operation ..................................................................................................................................................... 19
5.6.1. General information on mowing ............................................................................................................ 19
5.7. Removing clogging and jams...................................................................................................................... 19
5.8. Dismounting mower from tractor ................................................................................................................ 20
6. MOUNTING AND ADJUSTMENTS ............................................................................................................. 20
6.1. Setting mowing height in MIDO, GRINO, MAMUT, RIO flail mowers .................................................... 20
6.2. Setting mowing height in VINO flail mower ............................................................................................... 20
6.3. Service flap in RIO flail mower ................................................................................................................... 21
6.4. Maintenance ................................................................................................................................................. 22
6.4.1. Controlling belt tautness in belt gear in MIDO, GRINO, MAMUT, RIO flail mowers ........................ 22
6.4.2. Controlling belt tautness in belt gear in VINO flail mower ................................................................... 22
6.4.3. Checking flail blades ............................................................................................................................. 23
6.4.4. Daily maintenance ................................................................................................................................. 23
6.4.5. After-season maintenance and storing ................................................................................................... 24
6.4.6. Restarting the machine after longer idle periods ................................................................................... 24
7. LUBRICATION ................................................................................................................................................ 25
7.1. Angle gear .................................................................................................................................................... 25
7.2. Flail and copying shaft ................................................................................................................................. 25
7.3. Risks present when lubricating .................................................................................................................... 26
8. DEFINING TOTAL WEIGHT, AXIS LOAD, TYRE LOAD CAPACITY AND MINIMUM LOAD ..... 26
9. DEFECTS AND THEIR REPAIR .................................................................................................................. 28
10. REPAIR AND WITHDRAWAL FROM USE ............................................................................................... 29
10.1. Repair ......................................................................................................................................................... 29
10.2. Disassembly and withdrawal from use ...................................................................................................... 29
11. WARRANTY CARD ........................................................................................................................................ 29
12. WARRANTY TERMS ..................................................................................................................................... 30
12.1. Warranty claims procedures ...................................................................................................................... 30
12.2. Warranty repairs record ............................................................................................................................. 31
Instruction manual
Rear - front and rear flail mowers MIDO, GRINO, VINO, MAMUT, RIO
- 2 -
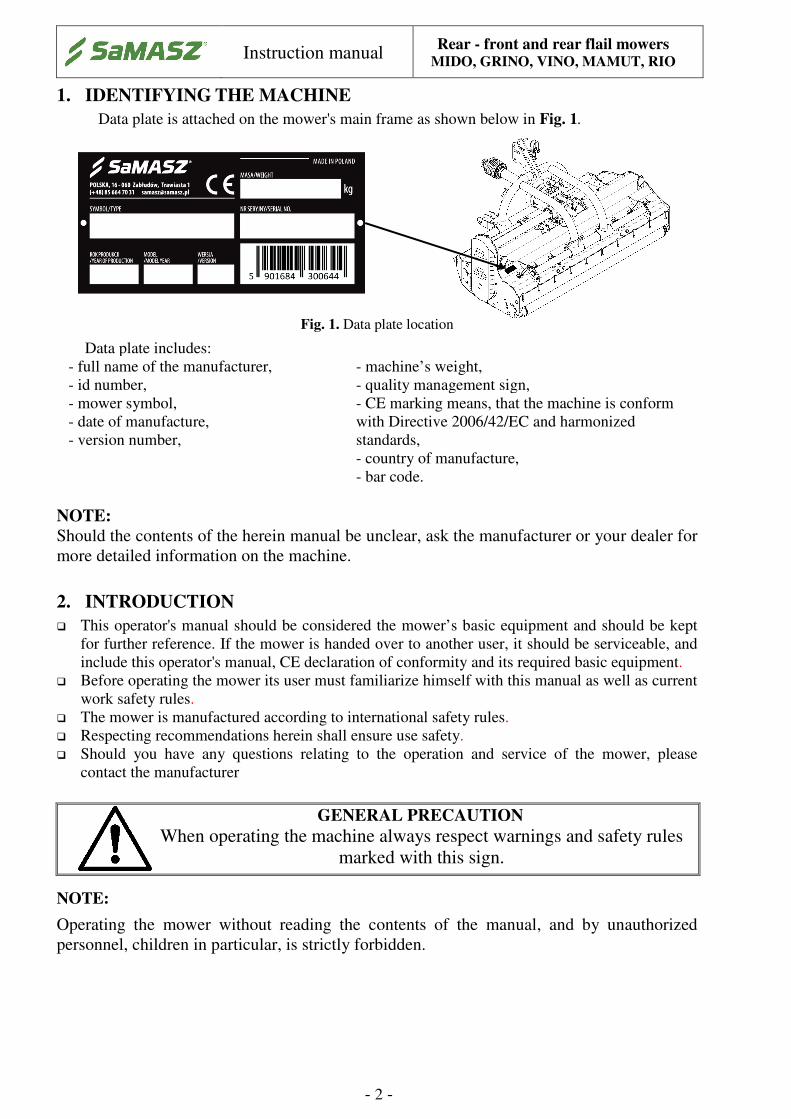
1. IDENTIFYING THE MACHINE
Data plate is attached on the mower's main frame as shown below in Fig. 1.
Fig. 1. Data plate location
Data plate includes:
- full name of the manufacturer, - machine’s weight,
- id number, - quality management sign,
- mower symbol,
- date of manufacture,
- version number,
- CE marking means, that the machine is conform
with Directive 2006/42/EC and harmonized
standards,
- country of manufacture,
- bar code.
NOTE:
Should the contents of the herein manual be unclear, ask the manufacturer or your dealer for
more detailed information on the machine.
2. INTRODUCTION
� This operator's manual should be considered the mower’s basic equipment and should be kept
for further reference. If the mower is handed over to another user, it should be serviceable, and
include this operator's manual, CE declaration of conformity and its required basic equipment.
� Before operating the mower its user must familiarize himself with this manual as well as current
work safety rules.
� The mower is manufactured according to international safety rules.
� Respecting recommendations herein shall ensure use safety.
� Should you have any questions relating to the operation and service of the mower, please
contact the manufacturer
GENERAL PRECAUTION When operating the machine always respect warnings and safety rules
marked with this sign.
NOTE:
Operating the mower without reading the contents of the manual, and by unauthorized
personnel, children in particular, is strictly forbidden.

Instruction manual
Rear - front and rear flail mowers MIDO, GRINO, VINO, MAMUT, RIO
- 3 -
3. INTENDED USE
Light duty class flail mowers MIDO are designed for mulching squares, pitches, lawns,
central reservations, roadsides and parks.
Middle duty class flail mowers GRINO 160/180/200/220, VINO 180 heavy duty class
MAMUT 250/280/300 and RIO 250/280 are designed for mulching soil fertilisation aiding plants
(lupinus, phacelia, sinapis, rapeseed, field pea, rye) before tillage, as well as plant remnants like
thick stalks of e.g. corn. Machines are used for shredding of thin branches, moderately thick small
scrubs and weeds.
WARNING!
Do not use the mower for purposes other than those listed in this manual.
Otherwise it will be classified as misuse and could release the manufacturer
from responsibility for any damages. The mower should be used, serviced
and repaired only by personnel familiar with its characteristics and with
safety regulations. Tampering with the mower may release the manufacturer
from responsibility for any resulting malfunctions or damages.
3.1. Technical data
Tab. 1. General specification MIDO / VINO
Mower type: MIDO
140
MIDO
160
MIDO
180
MIDO
200
MIDO
220
VINO
180
Mowing width [ft in / m] 4′ 7″ /
1.40
5′ 3″ /
1.60
5′ 11″ /
1.80
6′ 7″ /
2.00
7′ 3″ /
2.20
5′ 11″ /
1.80
Number of blades (flails) [pcs.] 18 20 22 24 26 20
Tractor PTO speed [rpm] 540 / 1000
Tractor power [HP] from 45 from 50 from 60 from 70 from 80 from 60
Transport length [ft in / mm] 3′ 7″ / 1080
Transport width [ft in / mm] 5′ 6″ /
1680
6′ 2″ /
1880
6′ 10″ /
2080
7′ 4″ /
2230
8′ 2″ /
2480
6′ 6″ /
1985
Height [ft in / mm] 940
Weight [lbs / kg] 816 /
370 915/ 415
959 /
435
992 /
450
1058 /
480
1036 /
470
3-point linkage category I / II
Emitted noise level LpA 73.5 ± 3.0 dB
LAmax 85.0 ± 3.0 dB
LCpeak 87.0 ± 3.0 dB
Tab. 2. General specification GRINO
Mower type: GRINO
160
GRINO
180
GRINO
200
GRINO
220
Mowing width [ft in / m] 5′ 3″ /
1.60
5′ 11″ /
1.80
6′ 7″ /
2.00
7′ 3″ /
2.20
Number of blades (flails) [pcs.] 20 24 30 36
Tractor PTO speed [rpm] 540 / 1000
Tractor power [HP] from 50 from 60 from 70 from 80
Transport length [ft in / mm] 3′ 9″ / 1150
Transport width [ft in / mm] 6′ 1″ /
1850
6′ 9″ /
2050
7′ 5″ /
2250 8′ / 2450
Height [ft in / mm] 3′ 3″ /
1000
3′ 5″ /
1040
3′ 5″ /
1040
3′ 5″ /
1040
Weight [lbs / kg] 1213 /
550
1345 /
610
1411 /
640
1466 /
665
3-point linkage category I/II
Emitted noise level LpA 73.5 ± 3.0 dB
LAmax 85.0 ± 3.0 dB
LCpeak 87,0 ± 3,0 dB

Instruction manual
Rear - front and rear flail mowers MIDO, GRINO, VINO, MAMUT, RIO
- 4 -
Tab. 3. General specification MAMUT, RIO
Mower type: MAMUT
250
MAMUT
280
MAMUT
300
RIO
250
RIO
280
Mowing width [ft in / m] 8′ 2″ /
2.50
9′ 2″ /
2.80
9′ 10″ /
3.00
8′ 2″ /
2.50
9′ 2″ /
2.80
Number of blades (flails) [pcs.] 30 36 36 30 36
Tractor PTO speed [rpm] 1000
Tractor power [HP] from
100
from
120
from
130
from
100
from
120
Transport length [ft in / mm] 4′ 1″ / 1235 3′ 12″ / 1210
Transport width [ft in / mm] 9′ 2″ /
2800
9′ 10″ /
3000
10′ 6″ /
3200
9′ 2″ /
2800
9′ 10″ /
3000
Height [ft in / mm] 3′ 5″ / 1055 3′ 4″ 1035
Weight [lbs / kg] 3′ 2″ /
975
3′ 5″ /
1040
3′ 6″ /
1060
3′ 3″ /
980
3′ 5″ /
1050
3-point linkage category II
Emitted noise level LpA 73.5 ± 3.0 dB
LAmax 85.0 ± 3.0 dB
LCpeak 87.0 ± 3.0 dB
LpA – noise level related to 8 hour working time. Averaged in time acoustic pressure level corrected by
frequency characteristic A.
LAmax – maximum value corrected by frequency characteristic A of acoustic pressure level.
LCpeak – peak level of acoustic pressure corrected by frequency characteristic C.
3.2. Design and working principle
The front-rear flail mower (Fig. 2) is constructed of the suspension frame (1), which is used to
connect the mower to the three point hitch, at the front and at the rear of the tractor (RIO – at the
rear of the tractor).
Drive from the vehicle PTO shaft is transmitted through jointed telescopic shaft (2) and
intersection angle gear (6) onto driving shaft (3), and then the belt gear (5) is driven by the flail
shaft (12), on which flail knives (13) are mounted.
Clevis feet of the flail blades (cutting) functions as a safeguard of the operating elements from
overloading and damage. During operation if the value of resistance force of the obstacle exceeds
the value of the centrifugal force of the blade, the blades tilts back and avoids the obstacle.
The mowing height is regulated by adjusting the position of the copying shaft (11).
Steel skids (14) protect the machine when passing through an obstacle.
In VINO flail mower, cleaning plate (9) helps remove winding grass and dirt on the copying
shaft (11). Counter knives (10) keep the comminuted material for re-mulching. Please adjust the
position of counter knives according to mowing height – do not set below the ground level.

Instruction manual
Rear - front and rear flail mowers MIDO, GRINO, VINO, MAMUT, RIO
- 5 -
Fig. 2. Overview of the mower
1 – Suspension frame
2 – PTO shaft
3 – Driving shaft
4 – Runner
5 – Belt gear
6 – Angle gear
7 – Guards
8 – Plate
9 – Cleaning plate (re: VINO)
10 – Counter knife (re: VINO)
11 – Copying shaft
12 – Flail shaft
13 – Flail blade
14 – Steel skid
3.3. Equipment and spare parts
The mowers are sold with the following standard equipment:
� warranty card,
� instruction manual along with a catalogue of spare parts and Declaration of Conformity,
� additional set of flail blades,
� telescoping articulated shaft,
� spray paint (150 ml).
Optional extra equipment:
� additional set of flail blades,
� additional set of bearings for the coping and working shafts,
� additional set of seals for the bearings of the coping and working shafts,
� protective chains.
� hitch with hydraulic movement – one-sided or double-sided – re: MIDO, VINO,
� additional row of counter cutters – re: MIDO, MAMUT,
� LED warning plate.
NOTE:
Optional extra equipment should be ordered separately.
1 2 5 6 7
14
4
8 9 10 11 13 12
3

Instruction manual
Rear - front and rear flail mowers MIDO, GRINO, VINO, MAMUT, RIO
- 6 -
Tab. 4. Recommended telescoping articulating shaft. Manufactured by Bondioli & Pavesi
Mower
Power Length Torque Symbol Shaft ends
HP ft in /
mm Nm Tractor Mower
MIDO 140/160/180/
200/220 64
2′ 2″-2′ 10″
660-885 830 7G7N066CE007007AX
1 3/8” z=6
collar cover
1 3/8” z=6
full cover
GRINO
160 35 2′ 10″-3′ 11″
860-1200 460 7G4N086CE007007HA
180/200/220 64 2′ 10″-3′ 11″
860-1185 830 7G7N086CE007007TA
VINO 180 64 2′ 2″-2′ 10″
660-885 830 7G7N066CE0071R0X
MAMUT 250/280/300 83
3′ 4″-4′ 7″
1010-1408 1080 7G8N101CE007007TA
RIO 250/280
PTO shafts of other brands with equivalent technical parameters may be used on the SaMASZ
permission.
IMPORTANT:
Make sure to follow the PTO shaft lubrication frequency. Lubrication points
marked in Fig. 3, Fig. 4 and Fig. 5 should be lubricated every 50 hours. Always
lubricate the PTO shaft before and after a period of longer idleness.
Fig. 3. PTO shaft lubrication points:
7G7N066CE007007AX, 7G7N086CE007007TA,
7G7N066CE0071R0X
Fig. 4. PTO shaft lubrication points:
7G4N086CE007007HA
Fig. 5. PTO shaft lubrication points:
7G8N101CE007007TA
3.3.1. Flail knives applicable in mowers MIDO, GRINO, VINO, MAMUT, RIO
In flail mowers can be used different types of flail knives (Tab. 5) depending on the purpose
and working conditions.
If found, replace any damaged or worn knives. In case of replacing cutting knives, they
should have the same weight. Admissible difference in weight should not be more than 3 g. If a
single knife requires to be replaced, the opposite one should also be replaced in order to prevent
improper balance.

Instruction manual
Rear - front and rear flail mowers MIDO, GRINO, VINO, MAMUT, RIO
- 7 -
WARNING!
Before operating make sure that mounting direction of knives is correct (see
Fig. 20).
Tab. 5. Types of flail knives
Types of flail knives MIDO GRINO VINO MAMUT RIO
KNIFE TYPE II Application: grass,
shoots, spikes, stalks,
shrubs, remnants after
trimming, hay
Option ‒ Option ‒
KNIFE TYPE III Application:
grass, shoots, spikes,
stalks, shrubs,
remnants after
trimming, hay
‒ Option ‒
KNIFE TYPE IIIA
Application:
grass, shoots, spikes,
stalks, shrubs,
remnants after
trimming, hay
‒ Option
KNIFE TYPE IV
Application:
grass, shoots, spikes,
stalks, shrubs,
remnants after
trimming, hay
Option ‒ Option ‒
KNIFE TYPE IVA
Application:
grass, shoots, spikes,
stalks, shrubs,
remnants after
trimming, hay
‒ Option
KNIFE TYPE V
Application: grass,
stubbles, branches,
bushes, shrubs
Standard Option Standard ‒
KNIFE TYPE VI
Application: grass,
shrubs, stalks,
remnants after
trimming, stubbles
‒ Standard ‒ Standard
Instruction manual
Rear - front and rear flail mowers MIDO, GRINO, VINO, MAMUT, RIO
- 8 -
4. SAFETY PRECAUTIONS
4.1. Safety rules and regulations
� Front or rear axis of the tractor should be balanced to enable its steering. If necessary, use front
or rear wheel weights.
� In order to keep steering conditions, make sure that impact on the front axis is at least 20% of
the complete impact on the tractor.
� Any operation with the hydraulic lift lever should be done from the operator's seat; never
operate the lever from outside of the tractor.
� For tractors equipped with EHR, control with hydraulic lift is done with a button located outside
the tractor's cabin. When operating, please exercise particular caution.
� When mounting the mower on a tractor, risk of wounding is likely. It is recommended that
operator wears protective gloves.
� Do not operate without safety guards. Neither operation with damaged nor raised guard is
allowed (risk of stones, etc. being thrown out). Damaged safety curtain should be replaced.
� Please make sure that no unauthorized personnel remains within the danger area of at least 164
ft (50m). Keep particular caution when operating near roads and in stony areas.
� Perform any maintenance and adjustment work only when the drive is disconnected and rotor
has stopped completely.
� When driving on public roads always comply with local traffic regulations, especially on the
warning lights.
CAUTION!
Make sure to perform any service and repair operations with the tractor drive
shut off and after all rotating parts have stopped completely.
WARNING:
Keep children away from the mower when operating and idle.
� Check bolts and other fasteners regularly. Do not operate with damaged or worn fasteners.
� Do not leave a running tractor without supervision. Before leaving the tractor turn off the engine
and remove the ignition key
� If any break in the machine operation occurs, turn off the drive
� Tractor cooperating with the mower should be equipped with a driver's cabin
� Mower should not be operated when the tractor-mower aggregate is not well balanced
� Never start the mower if any people or animals are around the mower
� Always follow safety labels describing hazards, and warning signs placed on the machine
� Before starting the tractor make sure that each drive is disconnected and control levers for
hydraulics are in neutral position
� Do not drive the mower backwards when operating
� Never get onto the mower
� Never stand between the tractor and the mower, unless the tractor-mower aggregate is protected
against moving with the tractor's parking brake
� Any inspections and adjustments may be conducted only when the mower is disconnected from
the tractor and on the ground
� For repairs or adjustments to be done under the mower make sure to secure it against falling
using a proper support
� If any part of the mower needs to be replaced, use only original spare parts according to spare
part list
� Pay particular attention to PTO shaft guards and mower and tractor spline shaft guards. Never
operate with damaged guards
� Inspect hydraulic hoses on regular basis and if any damage is found or their service life expires,
replace them. Service life for a hydraulic hose should be no longer than 5 years.

Instruction manual
Rear - front and rear flail mowers MIDO, GRINO, VINO, MAMUT, RIO
- 9 -
� Never repair damaged hydraulic hoses using a tape.
� When connecting hydraulic hoses to tractor’s hydraulic connectors make sure, that either tractor
or mower hydraulics are pressure free.
� When servicing hydraulic unit, always wear protective gloves and eyewear. Hydraulic oil
leaking under pressure (16MPa) may permeate through the skin and cause its infection
thereafter. If this is the case, immediately visit a doctor.
� The mower should be stored under a roof and in such way so as to effectively prevent animals
and people from being injured
� Before starting the mower, make sure there are no animals underneath the guard
� Before operating the mower, make sure all safety devices are in place and working. If not
working or damaged have them replaced
� Before any maintenance, assembly, disassembly works and when parking position the machine
on a solid ground and secure it against accidental movements.
� When cleaning the machine, use personal protective equipment for health protection.
� Do not leave agricultural machinery on slopes or other descents without providing protection
against free runaway.
� When operating on a stony field or nearby roads there is a risk of throwing out stones or other
objects which may pose a danger for passing-by vehicles on the road or for passers-by.
Therefore keep the safe distance.
� If any break in the equipment operation occurs, turn off the drive. Before leaving the tractor turn
off the engine and remove the ignition key, leave the cabin and make sure there are no
unauthorized personnel in the cabin and close the door.
� The operator is not allowed to leave the tractor while driving.
� In case of a major failure, stop the machine's drive, turn off the tractor's engine and remove the
ignition key. Next, please contact technical service, and if accident (i.e.: road accident) occurs,
respect first aid rules and call appropriate authorities.
� Keep the mower clean, so as to avoid a risk of fire.
� Pay particular attention to both PTO shaft and spline shaft guards. Never operate with damaged
guards.
� Rotating spring tines and other rotary elements present a danger to health and life of persons
present nearby the machine. Do not touch any moving machine parts
� Check pressure in the machine wheels regularly.
� In the event of any break in the equipment operation, turn off the drive.
In the event of a fatal failure, please call for technical service, and if an accident (in this case: road
accident) occurs, respect first aid rules and contact responsible services.
4.2. Qualifications of operator
To provide safe machine operation each person being the machine operator must meet the
following requirements:
� Operator should hold driving license, have ability to drive vehicles safely and know road traffic
rules.
� Operator must be in proper physical condition to be able to operate the machine.
� Operator must not be under the influence of alcohol, drugs and medicines, which all have
influence on vehicle driving and machine operation.
� Operator should be familiarized with this manual and follow its provisions.
� Operator should be familiar with working principles of both the vehicle and the machine, and be
able to recognize and avoid hazards resulting from operation of the aggregate.

Instruction manual
Rear - front and rear flail mowers MIDO, GRINO, VINO, MAMUT, RIO
- 10 -
4.3. Conditions of connecting mower with vehicle
� Before mounting operation, check whether the vehicle's and the mower's hitch categories are
compatible and make sure that vehicle's hitch load is adequate for the machine aggregated.
� When mounting the machine, examine technical condition of the mower's hitch assembly.
� Use only original pins and cotters to mount the mower on a vehicle.
4.4. Transport
� Any modifications in the position of the mower are possible only if no unauthorized personnel
is around (children in particular).
� For transport make sure that the mower has portable light board and the triangular safety sign
identifying a slow moving vehicle mounted; see 5.3.
� When transporting the mower make sure it is always placed in the transport position
� Before moving the mower to transport position make sure, that the tractor’s PTO is turned off
and all rotating parts have come to a complete stop.
� Always adjust driving speed to current road conditions and local traffic code.
� When driving on public roads the machine's width should not exceed 3.0 m (9'10")
(re: MAMUT 300).
� Do not exceed permissible speed of 19mph (30km/h).
� Do not transport any people or objects on the machine. � When taking turns pay particular attention and keep in mind the machine's weight and
dimensions.
� Bear in mind that when operating and transporting the machine in areas where high voltage
lines are present, exercise special caution as it is likely for the aggregate to touch the lines.
� It is forbidden for the operator to leave the vehicles when driving.
� Reckless driving and speeding may cause a traffic accident or collision.
4.4.1. Putting the machine onto another vehicle for transport
The carrier and the driver are responsible for safety during the transport of a mower.
All equipment and parts must be secured during transport.
The following rules should be observed so that transporting the mower on a transport vehicle
is safe:
� The mower can be lifted only in places designated for this purpose and labeled with a hook sign
(Fig. 6),
Fig. 6. Transport holders
� For hoisting please use hoists with capacity bigger than the machine weight as indicated on its
data plate. It also applies to the necessary cables and chains,
� Transport belts, belt suspensions, ropes cannot be damaged. Whenever damages to these parts
are found, replace them,
� When mounting slings, chains, clamps, etc. always keep in mind the center of gravity of the
machine,
b) a)

Instruction manual
Rear - front and rear flail mowers MIDO, GRINO, VINO, MAMUT, RIO
- 11 -
� For seizing the machines pick lines of adequate length, so that the angle between them was no
greater than 120°, and the angle of inclination between the cable and the vertical was no greater
than 60°,
� Collapsible parts should be blocked in transport position,
� When relocating the mower onto another vehicle, there should be no unauthorized personnel
permitted to remain within the danger area,
� The mower should be protected against moving on the vehicle's trailer.
WARNING!
Securing the maneuver area and providing safety for operation performed is
the responsibility of the person in charge of moving of the machine.
Fig. 7. Location of center of gravity
Tab. 6. Location of center of gravity
Model: Dimension [mm]
D E F
MIDO 140 366 741 585
MIDO 160 376 847 718
MIDO 180 377 917 725
MIDO 200 371 866 635
MIDO 220 385 1004 681
GRINO 160 429 792 576
GRINO 180 455 1082 700
GRINO 200 455 1182 700
GRINO 220 455 1278 700
VINO 180 548 1027 660
MAMUT 250 500 1234 733
MAMUT 280 500 1541 773
MAMUT 300 500 1540 740
RIO 250 488 1295 731
RIO 280 484 1418 661
4.5. Working parts
� Before operating the mower check the condition of the flail blades.
� Replace any worn or damaged flail blades immediately.
� In case of excessive machine vibrations during operation, make sure the flail shaft is well
balanced.
WARNING!
When replacing working parts, always use protective gloves.
F
D E

Instruction manual
Rear - front and rear flail mowers MIDO, GRINO, VINO, MAMUT, RIO
- 12 -
4.6. Telescoping articulated shaft
� Use only articulated telescopic shafts recommended by the manufacturer of the mower.
� Before operating learn provisions found in bar manufacturer's manual placed on the bar.
� In order to operate safely use only fully technically fit, undamaged PTO shafts. Damaged PTO
shaft shall be repaired or replaced with new one.
� Before any operation make sure whether PTO rpm have proper rotational direction.
� In order to prevent PTO shaft from damages, avoid extreme most positions of the mower and
high operating angles.
4.7. Residual risk
Despite the fact, that SaMASZ Sp. z o.o. company – the manufacturer of the mower takes the
responsibility for the mower design and manufacturing, in order to eliminate hazard, certain risk
when operating the mower is unavoidable.
Major source of risk results from the following operations:
� operation of mower by minors and operators not being familiarized with operator's manual,
� operation of mower by personnel under influence of alcohol or other abusive substances,
� failure to keep caution while transporting and moving the mower during operation,
� transport of personnel on the mower,
� presence of personnel and animals within the mower operating range,
� service and adjustment operations with engine running.
1) Risk of being caught or pulled in
This risk occurs when repositioning of the mower, or working on the mower while the
rotating elements are in motion and with guards removed.
During operation, maintenance or adjustment works on the mower always use protective
gloves, covered footwear, protective clothing without loose elements, such as belts etc. Always
observe the warnings placed on the mower.
When operating, maintenance and regulation works are conducted always wear protective
gloves, footwear and clothing with no loose parts, belts, etc. Always comply with warnings placed
on the mower.
2) Risk of injury, abrasion and damage of skin
This risk occurs when replacing working parts with sharp edges, cleaning the machine and
removal of any clogging and jams. For any repair and maintenance works always wear safety
gloves.
3) Risk of spurting hydraulic oil
During hydraulic hose connection and disconnection to and from the tractor make certain that
the hydraulic system of the tractor and the mower are not pressurized.
When dealing with a hydraulic system wear safety glasses and protective gloves. Regularly
check the hoses of the hydraulic system.
NOTE:
Present residual risk results mainly from erroneous actions of the mower’s operator and
failure to follow the instruction manual.

Instruction manual
Rear - front and rear flail mowers MIDO, GRINO, VINO, MAMUT, RIO
- 13 -
4) Prohibited actions
Bear in mind the following prohibited actions when operating the mower:
� Do not unblock the mower, make any adjustments or repairs when the mower is operating,
� Never change the sequence of operation and maintenance works specified in the operator's
manual,
� Never operate the mower when its working condition is poor or its safety guards are damaged,
� Never get your limbs close to mower's rotating parts,
� During repair and maintenance works on the mower always comply with the descriptions
included in the operator's manual, while making sure the tractor’s drive is turned off,
� Before any works, focus your attention solely on the tasks to do,
� Never operate the mower being under influence of alcohol, drugs, or strong medicines,
� Wear clothing that is not too loose, or too tight. Too loose clothing elements may be pulled in
by the mower's rotating parts,
� Make sure the mower is not operated by children no handicapped people.
When describing residual risk, the mower shall be considered a machine, which until the
moment of production launching had been designed and manufactured in accordance with the state
of the art at the day of the manufacture.
WARNING!
Despite following the specified instructions and prohibitions, residual risk is
still present.
4.7.1. Residual risk assessment
Keep the following recommendations:
� read operator’s manual thoroughly,
� make sure no person remains on the mower when operating and driving,
� make sure no person remains within the mower’s operating range,
� before any adjustment, maintenance and lubrication works on the mower, make sure its
engine is turned off,
� repair works on the mower can be done by properly qualified and skilled personnel only,
� before operating the mower, carefully read the operator’s manual,
� make sure that no children and unauthorized personnel stays around the mower In the event when avoiding or eliminating professional risk resulting from
exposure to noise is not possible through use of mass safety device or work
organization, the employer (farmer):
1) makes available personal hearing safety devices if the levels of noise in
working environment exceed 80 dB.
2) makes available personal hearing safety devices and ensures they are
properly used if the levels of noise in the working environment reach or
exceed 85 dB.
4.8. Safety labels and their meanings
IMPORTANT:
� All warning labels should be clean and legible,
� Lost or damaged labels must be replaced,
� New labels can be ordered at the Manufacturer.

Instruction manual
Rear - front and rear flail mowers MIDO, GRINO, VINO, MAMUT, RIO
- 14 -
N-01 N-03 N-04 N-05
Exercise particular caution
when PTO shaft is rotating
Read the operator’s manual
before use
Before any service or repair
disconnect the power
supply
Caution: belt gear, be
extremely careful
N-07 N-09 N-11 N-40
Do not operate the if any
personnel remains within
170 ft (50m) from the
machine
Caution: rotor
Lubrication point Transport holder for
machine handling
N-52 N-106 N-117
Wear protective gloves N-55 Warning: flail knives! Do
not approach the operating
mower
Avoid contact with liquid
coming out under pressure
N-167 N-168 N-210 N-233
Do not remain on the
machine while driving
Do not touch the machine
before the rotating parts
have not come to a
complete stop
Risk of foot injury, keep a
safe distance
It is forbidden to adjust the
position of counter knives
before the all moving parts comes into complete
standstill
(re: VINO 180)
N-14 N-15

Instruction manual
Rear - front and rear flail mowers MIDO, GRINO, VINO, MAMUT, RIO
- 15 -
Fig. 8. Location of warning labels
NOTE:
Any spare part used for repair of the mower should have all safety labels provided by the
manufacturer.
5. USE OF MOWER
5.1. Mounting mower on tractor
The mower should be connected to the tractor using the three point hitch as illustrated
in Fig. 9. The upper connector (1) and the hangers (3) of the lower ties of the tractor should be
placed on the bolts (2) of the suspension frame of the mower
Machine should be adjusted in such a way that the sliding skid is perpendicular to the ground.
After connecting the mower it should be adjusted on level ground using the upper connector (1) and
the hangers (3) of the lower ties of the tractor (Fig. 9).
After connecting the mower to the tractor check the lengthwise balance and steering ability of
the tractor-mower unit. To do this, calculate to formulas given in the chapter 8 or weigh the set, and
then drive on the scales only with front/rear axis of the tractor (the mower must be in the transport
position, lifted up). If the weight of the front/rear axle of the tractor is at least 20% of the entire
weight of the unit then steering ability has been preserved. If this is not the case the front axle
should be additionally weighed down. The same procedure should be followed when connecting the
mower to the front/rear of the tractor.
N-28
(N-29–540 rpm)
N-162
N-05
N-28
N-29
N-01; N-03; N-04; N-07; N-09
N-14; N-15; N-52; N-106
N-117; N-162; N-167; N-168
N-210; N-233

Instruction manual
Rear - front and rear flail mowers MIDO, GRINO, VINO, MAMUT, RIO
- 16 -
Fig. 9. The mower mounted on the tractor
5.1.1. Preparing mower for connection to front of tractor
To prepare VINO or MIDO flail mower with rigid hitch (Fig. 10a) for operation on the
front of the tractor, dismount the hitch (4) by unscrewing bolts (6). Turn the hitch around and next
remount it and twist bolts. After the above mounting steps are done, swap plastic guards and PTO
shaft on the main gear.
To prepare MIDO, GRINO or MAMUT flail mower with mowing hitch (Fig. 10b, Fig. 11)
for operation on the front of the tractor, dismount the hitch (4) by removing pins (5) and unscrewing
bolts (6). Turn the hitch around and next remount it, twist bolts and mount pins. After the above
mounting steps are done, swap plastic guards and PTO shaft on the main gear.
Fig. 10. The hitch of the MIDO, VINO flail mowers a) rigrid hitch, b) moving hitch
Fig. 11. The moving hitch in the GRINO and MAMUT flail mowers
3
1
2
4 5 6 4
6
a) b)
4 5

Instruction manual
Rear - front and rear flail mowers MIDO, GRINO, VINO, MAMUT, RIO
- 17 -
For MIDO, VINO or GRINO flail mowers mounted on the rear of the tractor, they operate at
540 rpm. When operating with mower mounted on the front 3-point linkage adjust the machine to
PTO speed of 1000 rpm.
Follow the procedure:
� in MIDO 140 flail mower, switch belt pulleys around – at the top SPB 170-3 belt pulley, at the
bottom SPB 236-3 belt pulley,
� in MIDO 160/180/200/220 flail mowers, switch belt pulleys around – at the top SPB 170-4 belt
pulley, at the bottom SPB 236-4 belt pulley,
� in VINO 180 flail mower, switch toothed wheels around – at the top TB-48-8M-50 toothed
wheel, at the bottom TB-64-8M-50 toothed wheel,
� in GRINO flail mower, switch belt pulleys around – at the top SPB 180-4 belt pulley, at the
bottom SPB 212-4 belt pulley – exchange wedge belts to XPB 1450 (see parts catalogue),
In case of improper PTO shaft’s rotational direction turn the gear by 180°, change place of
tightening of drain vent and vent so that it is in the upper section of the gear.
5.2. Connecting the PTO shaft
During PTO assembly, pay attention to the pictogram placed on the shaft. It is indicating the
correct assembly direction.
Prior to commencing operation, examine and adjust length of PTO shaft, which is designed to
mount machine on tractor. The cover should be secured so that it does not spin by securing the
holding chains to a permanent part of the body of the tractor and the loop on the guard of the
splined shaft of the mower drive shaft.
NOTE:
If necessary, shorten the PTO haft according to its operator’s manual given by the shaft’s
manufacturer (Fig. 12).
Fig. 12. Instruction of PTO shaft shortening
CAUTION!
The articulated telescopic shaft should remain connected only during mower
operation. During transport or any servicing operations the shaft should be
disconnected from the PTO of the tractor.

Instruction manual
Rear - front and rear flail mowers MIDO, GRINO, VINO, MAMUT, RIO
- 18 -
CAUTION!
Use machines with correspondingly designed driving PTO shafts. Before
work, safety guards should be inspected whether they (in the tractor, the
mower and the PTO shaft) are placed correctly and are not damaged.
Damaged or missing parts must be replaced. Make sure that the PTO shaft is
mounted properly. Approaching the rotating parts is strictly forbidden, as it
may cause serious injuries or even death. For any service and repair works on
the shaft and the mower, makes sure that the tractor’s engine and its drive is
turned off. Before operation, read the operator's manuals of both the machine
and the PTO shaft.
NOTE:
PTO shaft’s end with friction clutch should be mounted at the mower’s side.
5.3. Preparing mower for transport
Preparation of the front-rear flail mower mounted on the tractor for transport - movement on
public roads - requires the following:
� during transporting the machine it is recommended to attach the machine to the upper link
round hole;
� lift the mower using the front or rear three-point hitch;
� adjust the side setting to the minimum – procedure of changing the side setting of the mower
was described in point 5.5;
� road traffic safety and current laws require that during transport over public roads the mower
must be equipped with a portable reflective triangle mounted on the back of the mower;
� while manoeuvring pay special attention to the space around the tractor-mower unit.
WARNING!
Moving the mower from operating position to transport position and the way
around, should only take place on even and stable ground. Prior to making
the moves make sure whether there are no unauthorized persons exposed to
any hazard.
5.4. Preparing mower for operation
Before starting operation the following procedures must be followed. After fulfilling these
procedures the mower is ready for operation.
The following should then be done:
� gently lower the cutting unit until the copying shaft touches the ground,
� turn on the power take-off until the flail shaft reaches nominal speed,
� put the tractor in gear and begin work.
5.5. Switching the mower from central to side position
With mowers with hydraulic adjustment the lateral positioning of the mower is done using the
hydraulic system. In order to change the position of the mower the appropriate lever in
the hydraulic system of the tractor is depressed and released when the desired position of the mower
is obtained.
Instruction manual
Rear - front and rear flail mowers MIDO, GRINO, VINO, MAMUT, RIO
- 19 -
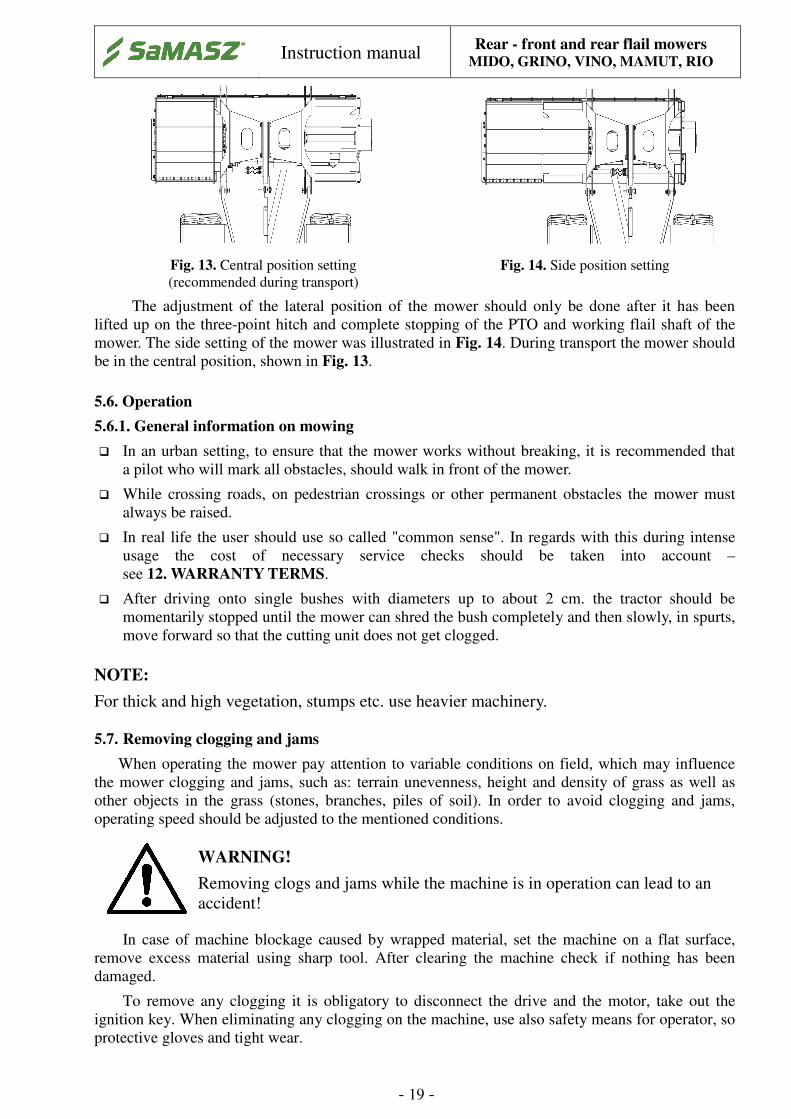
Fig. 13. Central position setting
(recommended during transport)
Fig. 14. Side position setting
The adjustment of the lateral position of the mower should only be done after it has been
lifted up on the three-point hitch and complete stopping of the PTO and working flail shaft of the
mower. The side setting of the mower was illustrated in Fig. 14. During transport the mower should
be in the central position, shown in Fig. 13.
5.6. Operation
5.6.1. General information on mowing
� In an urban setting, to ensure that the mower works without breaking, it is recommended that
a pilot who will mark all obstacles, should walk in front of the mower.
� While crossing roads, on pedestrian crossings or other permanent obstacles the mower must
always be raised.
� In real life the user should use so called "common sense". In regards with this during intense
usage the cost of necessary service checks should be taken into account –
see 12. WARRANTY TERMS.
� After driving onto single bushes with diameters up to about 2 cm. the tractor should be
momentarily stopped until the mower can shred the bush completely and then slowly, in spurts,
move forward so that the cutting unit does not get clogged.
NOTE:
For thick and high vegetation, stumps etc. use heavier machinery.
5.7. Removing clogging and jams
When operating the mower pay attention to variable conditions on field, which may influence
the mower clogging and jams, such as: terrain unevenness, height and density of grass as well as
other objects in the grass (stones, branches, piles of soil). In order to avoid clogging and jams,
operating speed should be adjusted to the mentioned conditions.
WARNING!
Removing clogs and jams while the machine is in operation can lead to an
accident!
In case of machine blockage caused by wrapped material, set the machine on a flat surface,
remove excess material using sharp tool. After clearing the machine check if nothing has been
damaged.
To remove any clogging it is obligatory to disconnect the drive and the motor, take out the
ignition key. When eliminating any clogging on the machine, use also safety means for operator, so
protective gloves and tight wear.

Instruction manual
Rear - front and rear flail mowers MIDO, GRINO, VINO, MAMUT, RIO
- 20 -
5.8. Dismounting mower from tractor
WARNING:
When dismounting, make sure there is no person in between the machine
and the tractor.
To dismount the mower from the tractor, do the following:
� turn the cutter-shaft’s drive off,
� place the mower on an even, paved ground, lower and secure support legs, check, if the mower
is properly secured against falling,
� turn the tractor's engine off and take ignition key out,
� dismount the PTO shaft and place it on a shaft holder,
� detach tractor’s top and lower links from the mower’s hitch,
� carefully drive away with the vehicle.
6. MOUNTING AND ADJUSTMENTS
6.1. Setting mowing height in MIDO, GRINO, MAMUT, RIO flail mowers
Please adjust the mowing height according to own needs and in accordance with Fig. 15
and Tab. 7. Mowing height adjustment is possible by changing position of copying shaft. Therefore
undo bolts fastening the copying shaft and re-tighten them on the desired level.
Fig. 15. Setting the mowing height
Tab. 7. Possible mowing heights
Position Mowing heights – A[mm] in mowers:
MIDO GRINO MAMUT RIO
I + 0 21 12 8 10
II + 0 38 31 30 32
III + 0 51,5 49 50 52
IV + 0 62 68 68 70
V + III 21 - - -
VI + IV 55 - - -
6.2. Setting mowing height in VINO flail mower
In VINO flail mower, there is a possibility of set the copying shaft in two main positions
marked by (0) and (1) in Fig. 16. The default position is 0 position. Depending on the own needs,
there is a possibility of the mowing height adjust by using (I-VIII) positions (Tab. 8). To changing
the copying shaft height in (1) position, holes in the sides of the mower should be made and counter
knives should be demounted. In this position, the copying shaft is cleaned by flail shaft. The rear
plate position should be adjusted to own needs.
Instruction manual
Rear - front and rear flail mowers MIDO, GRINO, VINO, MAMUT, RIO
- 21 -
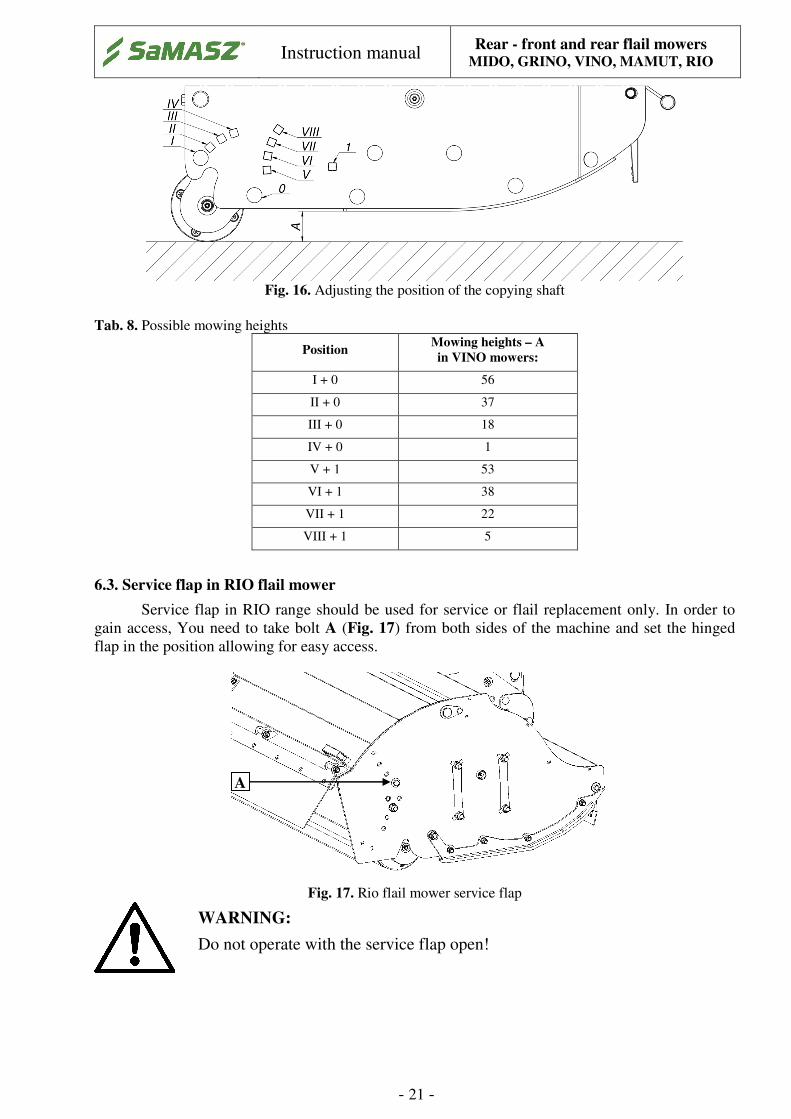
Fig. 16. Adjusting the position of the copying shaft
Tab. 8. Possible mowing heights
Position Mowing heights – A
in VINO mowers:
I + 0 56
II + 0 37
III + 0 18
IV + 0 1
V + 1 53
VI + 1 38
VII + 1 22
VIII + 1 5
6.3. Service flap in RIO flail mower
Service flap in RIO range should be used for service or flail replacement only. In order to
gain access, You need to take bolt A (Fig. 17) from both sides of the machine and set the hinged
flap in the position allowing for easy access.
Fig. 17. Rio flail mower service flap
WARNING:
Do not operate with the service flap open!
A

Instruction manual
Rear - front and rear flail mowers MIDO, GRINO, VINO, MAMUT, RIO
- 22 -
6.4. Maintenance
6.4.1. Controlling belt tautness in belt gear in MIDO, GRINO, MAMUT, RIO flail mowers
Make sure to check tightening of V-belts in the belt gear on regular basis.
A tightening mechanism (2), equipped with a tightening spring (3) with bolt, is used to adjust
the tautness of the belt (1) (Fig. 18). Tightness of the belts is adjusted through tightening the nut (4)
onto the bolt. The correct tightness of the belts can be confirmed by pressing the belt with a finger
with the force of approximately 10 kg the belt yields about 0.5 cm.
Fig. 18. Overview of the belt gear in MIDO, GRINO, MAMUT, RIO flail mowers
6.4.2. Controlling belt tautness in belt gear in VINO flail mower
Make sure to check tensioning of belt in the belt gear on regular basis.
In order to tension the toothed belt in VINO flail mower (Fig. 19) it should be:
� place the mower on an even, paved ground,
� remove the belt gear cover (2),
� loosen the screw (3), (4),
� tighten the adjustment screw (5) to obtain the required belt tension,
� adjust the position of angle gear (7) by the screw (6). The driving shaft (8) should be in parallel
position to the ground,
� tighten the screws (3), (4),
� check tensioning of belt,
� put on the belt gear cover.
2
3
4
1

Instruction manual
Rear - front and rear flail mowers MIDO, GRINO, VINO, MAMUT, RIO
- 23 -
Fig. 19. a) Overview of the belt gear in VINO flail mowers; b) belt tensioning system in VINO flail mowers
6.4.3. Checking flail blades
IMPORTANT:
Always check the condition of flail knives and flail knife sockets before each
operation. Worn or damaged elements should be considered as hazardous for
life.
If needed replace knives. To keep the shaft well balanced, knives must be of the same type
and weight. In the case of excessive vibrations of the machine, please balance the flail shaft.
After flail knives are replaced, make sure they are installed in a correct position, as in Fig. 20.
Knives can be obtained from the manufacturer of the mower – "SaMASZ".
Fig. 20. Way of assembling the flail knives
Worn flail blade securing bolts should always be replaced. Using bolts with strength rating
lower than 10.9 is forbidden.
6.4.4. Daily maintenance
The following should be done everyday after finishing work:
� wash the mower removing any remains of dirt or vegetation,
� check all visible external parts and assemblies and their connections,
� tighten all loose bolt connections and replace all worn or damaged parts,
� lubricate the telescoping shafts of the ATS with an STP grease,
1
a)
2 5
7
8
6
4
3
b)
Spinning
direction Direction of travel

Instruction manual
Rear - front and rear flail mowers MIDO, GRINO, VINO, MAMUT, RIO
- 24 -
� if necessary lubricate all other assemblies in accordance with lubricating instructions (point 0),
� lubricate the bearings on both sides of the flailing shaft using ŁT 43 grease,
� check for any play within the bearings of the copying and flailing shafts. In the event of any
play replace the bearings.
6.4.5. After-season maintenance and storing
After the end of mowing season the mower should be carefully cleaned and washed and after
drying all working surfaces and suspension pins should be protected from rust by lubricating with
grease.
Additionally:
� touch up any chips in the paint,
� check the oil levels in the gearbox,
� examine technical condition of the copying and flail shaft’s bearings. If necessary replaced
bearings and seals (execution of the activity by experts from SaMASZ company),
� protect working parts (pins, joints, cylinder rods, etc.) against corrosion by applying a thin film
of solid grease on their surfaces.
Dismounted mower should be stored in its parking position, so it is set stabile on slides and on
the ground shaft. It is recommended, to store the machine on paved ground, preferably under the
roof, inaccessible to unauthorized personnel (especially children). The machine should be stored in
a dry place, in case of wet weather recall that the machine should be greased properly.
6.4.6. Restarting the machine after longer idle periods
After the storing period perform the following:
� Make sure that all nuts and screws are tightened with correct torque (Tab. 9).
� Make sure that all guards are installed in place.
� Lubricate the whole machine.
� Examine condition of flail knives, and if necessary, replace them with new ones.
Tab. 9. Torque values for bolts
In the absence of specific torque values, the following chart can be used as a guide to the
maximum safe torque for a particular size and grade of fastener. There is no torque difference for
fine or coarse threads. Torque values are based on clean, dry threads. Reduce value by 10% if
threads are oiled before assembly.

Instruction manual
Rear - front and rear flail mowers MIDO, GRINO, VINO, MAMUT, RIO
- 25 -
1
2
7. LUBRICATION
7.1. Angle gear
Everyday before starting work the oil level should be checked and if necessary refilled by
removing plug (1) in the upper part of the gear (Fig. 21). The oil level is checked by removing the
control plug (2) on the side of the gear. If the oil level is too low replace it until it appears in the
control opening (2). The amount of oil in the gear is about 1 liter (Tab. 10). Oil levels should be
checked with the mower on level ground.
Tab. 10. Oil capacities
Fig. 21. Control point and oil change point of the angle gear
7.2. Flail and copying shaft
Greasing with LT – 43 grease of flail shaft bearing (both sides) should be performer on
the show points Fig. 22.
Fig. 22. Lubrication points of the bearings of flail shaft
Copying shaft should also be greased with (LT – 43) on both sides in points shown in Fig. 23.
Fig. 23. Lubrication points of the bearings of copying shaft
Mower
type
Amount
of oil [L] Oil type
Changing
frequency
090 1.1 SAE 80W-90
API GL-4
once every 3
seasons
(with heavy use) 100 2.0
Lubrication
points
Lubrication
points

Instruction manual
Rear - front and rear flail mowers MIDO, GRINO, VINO, MAMUT, RIO
- 26 -
7.3. Risks present when lubricating
� If risk of splashing is present, make sure to wear protective eyewear with side guards.
� When lubricating protect eyes and skin against contact with the substance. Therefore use
adequate protective wear with long sleeves and protective footwear. Also use protective gloves.
In case of a contact with skin, immediately wash the infected area with plenty of water with
soap.
� Do not allow the product to contaminate water outlets, water courses and soils.
� In case of an unintentional release to the environment plug the leak, limit the spillage, and then
collect the oil with non-flammable absorbent material (e.g. sand).
� The product is flammable. In case of fire, use adequate fire-extinguishing means (e.g. foam,
water mist, extinguishing powders). Do not use water jets.
� Disposal of the used product must be made according to official regulations. Improper disposal
of the used oil poses danger to the environment.
8. DEFINING TOTAL WEIGHT, AXIS LOAD, TYRE LOAD CAPACITY
AND MINIMUM LOAD
NOTE:
When mounting the machine on a tractor using front and/or rear 3-point linkage, a maximum
value of permissible load cannot be exceeded – tractor's front axis load must be 20% of the
tractor's overall weight.
Before using the tractor-machine assembly, check whether these conditions are met, while
calculating and weighing the assembly.
For calculations the following data is necessary:
T [kg] Tractor's overall weight
TP [kg] Front axis load on unloaded tractor
TT [kg] Rear axis load on unloaded tractor
MP [kg] Total weight of machine mounted on front 3-point linkage or weight of front ballast
MT [kg] Total weight of machine mounted on rear 3-point linkage or weight of rear ballast
A [m] Distance between tractor's front axis center and center of gravity of machine mounted
on front 3-point linkage / front ballast
B [m] Distance between tractor's axes
C [m] Distance between tractor's rear axis center and centers of ball joints on tractor's lower
links
D [m] Distance between centers of ball joints on tractor's lower links and center of gravity of
machine mounted on rear 3-point linkage / rear ballast 2
3 2
3 1
3 2
3 2
3 2
3 1
3 1
3 1
M MT TP
TT
A B C D

Instruction manual
Rear - front and rear flail mowers MIDO, GRINO, VINO, MAMUT, RIO
- 27 -
Refer to tractor's operation manual
Refer to technical data for machine in operation manual or price list
Dimensions / measurement
� Calculating minimum weight of front ballast MP min. – machine mounted at tractor's rear:
� Calculating real axis load at tractor's front axis TP rzecz.:
*If the value of front axis load (TP rzecz) is less than 20 % of tractor’s overall weight (T), apply additional load on the
front axis.
� Calculating total weight of tractor-machine assembly MC:
� Calculating real axis load at tractor's rear axis TT rzecz.:
� Tire load capacity – apply double the load indicated by the tires’ manufacturer.
Enter the above calculation data and technical data provided by the manufacturer in the below
table.
Real value from
calculations
Value to technical
specification
Double value of
tire capacity load
Minimum weight of front
ballast
MPmin
Total weight
MC
≤
Front axis load
TP rzecz.
≤
≤
Rear axis load
TT rzecz.
≤
≤
Minimum ballast must be reached by mounting the machine or additional weights provided on the tractor.
Values resulting from calculations should be lower than or even to values given in technical specification.
1
2
3
Instruction manual
Rear - front and rear flail mowers MIDO, GRINO, VINO, MAMUT, RIO
- 28 -
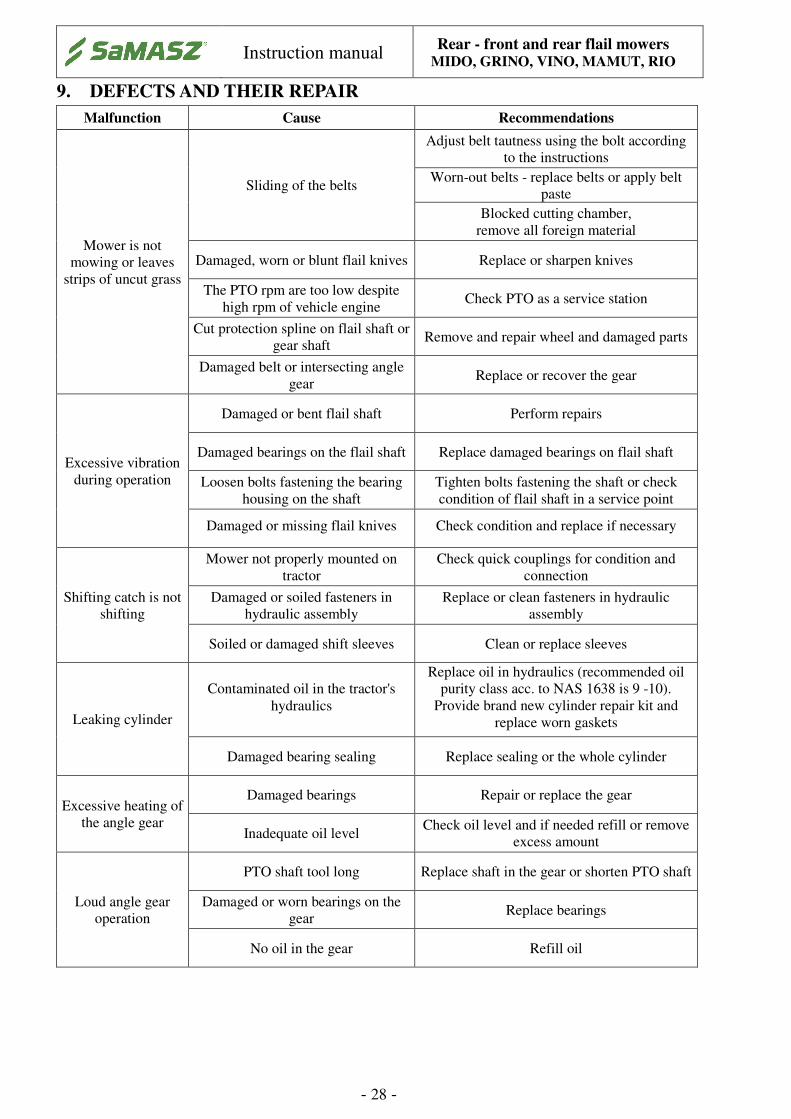
9. DEFECTS AND THEIR REPAIR
Malfunction Cause Recommendations
Mower is not
mowing or leaves
strips of uncut grass
Sliding of the belts
Adjust belt tautness using the bolt according
to the instructions
Worn-out belts - replace belts or apply belt
paste
Blocked cutting chamber,
remove all foreign material
Damaged, worn or blunt flail knives Replace or sharpen knives
The PTO rpm are too low despite
high rpm of vehicle engine Check PTO as a service station
Cut protection spline on flail shaft or
gear shaft Remove and repair wheel and damaged parts
Damaged belt or intersecting angle
gear Replace or recover the gear
Excessive vibration
during operation
Damaged or bent flail shaft Perform repairs
Damaged bearings on the flail shaft Replace damaged bearings on flail shaft
Loosen bolts fastening the bearing
housing on the shaft
Tighten bolts fastening the shaft or check
condition of flail shaft in a service point
Damaged or missing flail knives Check condition and replace if necessary
Shifting catch is not
shifting
Mower not properly mounted on
tractor
Check quick couplings for condition and
connection
Damaged or soiled fasteners in
hydraulic assembly
Replace or clean fasteners in hydraulic
assembly
Soiled or damaged shift sleeves Clean or replace sleeves
Leaking cylinder
Contaminated oil in the tractor's
hydraulics
Replace oil in hydraulics (recommended oil
purity class acc. to NAS 1638 is 9 -10).
Provide brand new cylinder repair kit and
replace worn gaskets
Damaged bearing sealing Replace sealing or the whole cylinder
Excessive heating of
the angle gear
Damaged bearings Repair or replace the gear
Inadequate oil level Check oil level and if needed refill or remove
excess amount
Loud angle gear
operation
PTO shaft tool long Replace shaft in the gear or shorten PTO shaft
Damaged or worn bearings on the
gear Replace bearings
No oil in the gear Refill oil

Instruction manual
Rear - front and rear flail mowers MIDO, GRINO, VINO, MAMUT, RIO
- 29 -
Serial number
Manufacture date
Guarantor’s stamp
Controller’s signature
Date of sale
Seller’s stamp
Seller’s signature
10. REPAIR AND WITHDRAWAL FROM USE
10.1. Repair
REMEMBER:
Before repair works make sure the mower is disconnected from the tractor.
Before repairing or assessing whether the mower is still serviceable, it should be carefully
cleaned of dirt, mud and plant remains.
After checking nuts and bolts, proper slack in joints and gears we can assess if the machine is
still serviceable. Worn out bolts, pegs, pins, discs, holders, knives etc. should be replaced.
Once the mower is repaired perform the following:
� make sure that all elements are installed properly,
� install the removed guards,
� check whether screws and nuts are tightened,
� check proper slack in joints and in gears,
� once all the guards are installed, perform a warm-up start to make sure the repaired machine
operates properly.
10.2. Disassembly and withdrawal from use
If the mower cannot be repaired anymore, it should be withdrawn from use. Therefore oil
from the frame gearbox should be drained and thoroughly clean any excess oil with cleaning agent,
take parts made of plastic off. They should be used further on or delivered to a proper waste
treatment company. Upon completing the required activities the mower should be sold to breaker's
yard.
IMPORTANT:
When dismounting the machine pay particular attention to and additional
dangers, as crushing, cutting, wounding, concussion and abrasion. Use
proper tools and personal protective equipment: protective gloves, clothing
and footwear, eye wear, etc. Pay attention so that the machine works
efficiently, and thus it is required to secure the machine with supports.
11. WARRANTY CARD
REAR – FRONT AND REAR FLAIL MOWER:
This product has been checked and deemed fully serviceable and cleared for use.
NOTE
Warranty card – if not filled in, corrected or illegible – is not valid.

Instruction manual
Rear - front and rear flail mowers MIDO, GRINO, VINO, MAMUT, RIO
- 30 -
12. WARRANTY TERMS
12.1. Warranty claims procedures
1. The manufacturer warrants good quality and defect-free operation of the mower under this
warranty if the mower is operated in accordance with the operator's manual. This covers only
operation of the mower in proper conditions where the following obstacles are not present:
a) rocks,
b) drainage, waterworks, or gas sumps and other municipal obstacles
c) curbs running perpendicular to operating direction
d) perpendicular ditches and channels
e) concrete posts or similar, etc.
As the above conditions rarely occur please observe the instructions in this manual under
point 5.6 Operation.
WARNING!
In the event where the obstacles described above occur the operator should
be familiar with point 5.6.1. General information on mowing.
2. Faults or damages to the machine found within 12-month period from the date of purchase shall
be removed free of charge at the purchaser’s or the manufacturer’s.
3. Faults or damages should be submitted personally, in writing or by telephone. Repairs shall be
carried out within 14 days. Any repairs under the warranty should be carried out by authorized
SaMASZ service facilities.
4. Warranty claims regarding the product replacement or repayment are considered within 14 days
by the manufacturer.
5. The following conditions are not covered by warranty:
a) wear and tear of parts such as: mowing knives, slides, intersecting axis gears and parts
within, bushings and sliding bushes, joints, knife holders, cutting knives, V-belts,
conditioner’s tines and rollers, roller conditioner’s rubbers, bearings, rubber - metal
fenders, safety curtains, conveyor’s belts, connective elements, etc. These repairs may
be carried out only at the purchaser cost.;
b) use of the machine for any purpose other than described in the operator's manual,
c) working on stony fields and consequences,
d) running into any obstacle,
e) too fast lowering of the machine onto the ground,
f) random events or other occurrences, for which the Manufacturer cannot be held
responsible.
6. The Purchaser bears the costs of technical evaluation – if the Manufacturer finds that a claimed
product is free of defects and this is confirmed by technical report
7. The Manufacturer has the right to cancel the warranty in the following cases
a) hampering with the mower, modifications to its mechanical design or intentional
damages.
b) vast damage caused by fortuitous events or others, for which the Manufacturer does
not bear any responsibility,
c) lack of required records in the warranty card or filling in the warranty card
independently,

Instruction manual
Rear - front and rear flail mowers MIDO, GRINO, VINO, MAMUT, RIO
- 31 -
d) use of the mower for any purpose other than described in the operator's manual.
8. The Manufacturer can break the service agreement with immediate effect when the user does
not pay the invoice according to that agreement in a timely manner and the delay in payment is
longer than 30 days from maturity date. Breaking the service agreement by the Contractor due
to causes dependent on the user shall lead to termination of the warranty given for the particular
machine.
9. The Manufacturer shall not bear any compensation responsibility for the loss caused by the
machine breakdown during its operation.
NOTE:
Please ask your dealer to complete and return the warranty card with date and place of
purchase, and dealer's stamp and signature. Otherwise you may lose your warranty rights.
NOTE:
The Manufacturer reserves the right to introduce design changes.
NOTE:
The SaMASZ company is constantly working on the development of all of its machine types and
models. Therefore, any modifications of our machinery due to their form, equipment and
technology are likely. No claims can arise from data, drawings and descriptions included herein
as well as the spare parts list.
SaMASZ is not responsible for printing errors.
12.2. Warranty repairs record
Repair scope and spare parts replaced:
Date, stamp and signature of repair shop.
Date, stamp and signature of repair shop.
Date, stamp and signature of repair shop.
Top Related